Audi TT Forum banner

How To: Installing Rear Screen DAB Aerial Amp Module

19K views 26 replies 16 participants last post by  FPSUsername  
#1 ·
This modification works well and is well worth the effort in my opinion. DAB reception is good and it does away with the need for an ugly stick-on window aerial.

This modification should not be attempted unless you are competent/ confident at soldering.

The parts required are:-

Aerial amplifier module 8J8035225J
Connector housing 1C0973119B
2 x Repair wires 000979009E
Fixing screw N90775001
Fixing clip WHT000025
3.5m Aerial cable with universal Fakra connectors VAG 000098654A
Zip ties and/or cloth loom tape

The repair wires and aerial cable are across brand VAG part numbers and may be cheaper at a Skoda dealership!

Tools required are:-

Trim removal tools
T20 and T25 Torx drivers
Tweezers or needle nose pliers
Wire cutters and stripper
Suitable soldering iron

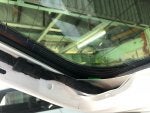
To fit the amp module both parts of the plastic trim must be removed from inside the rear hatch. The lower trim is removed first by removing the two screws from inside the handle recess (T20 Torx) and then pulling it away starting at the ends. Use a trim tool to get started. Popping the clips out requires a firm pull. The manual hatch lock release must be disconnected from the right side. Then remove the screws from the lower ends of the upper trim (T25 Torx) and the cable clip from each side near the screw. Again use a trim tool at the ends to get started and pull the clips out. Firm pulling is required and it is easier with two people as the trim is unwieldy and could be damaged. Any spring clips that remain in the hatch should be removed and re-inserted in the trim.

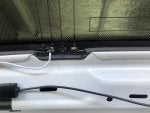
The amp module fits on the top left side of the hatch in the same way as the existing module on the right side. My module came complete with the fixing clip but as the clip only costs 0.67p it may be just as well to order one anyway.
The fixing screw expands the clip and holds the module in place. The screw needs to have a head diameter of 9.5mm to avoid fouling the Fakra connector. The screw supplied to me under the above part number which should have been the correct was one with a large head that was too big. The installed picture shows the correct screw.

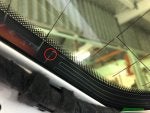
Take the two repair wires and cut three of the terminals off with the same length of cable as there is on the right hand module. You will have one length of cable with a connector spare. Strip 3mm of insulation from the wire ends and tin them. Insert the three terminals into the housing and snap the housing closed. Note that the housing identifies the terminals as 1,2,& 3. Above the amp module you will see three solder pads on the screen. On mine a very short length of snipped off wire was soldered to each one. I carefully, with a very sharp craft knife removed the grey foam directly below the solder pads. You will notice that the three pads are identified by one, two and three dots. Carefully de-solder and remove the three snipped off wires from the pads and tin the pads. Plug the connector into the amp module and bend the wires so that the cable from terminal one goes to pad one etc. If in doubt look at the way the connections to the right hand module are made. Carefully solder the three wires to their respective pads. You will need to hold the cables in position with tweezers or needle nosed pliers. Apply the minimum amount of heat needed to make a good joint.

Plug the end of the aerial cable with the Fakra cable into the green connection on the module.
The aerial cable needs to be run behind the right hand A pillar trim (the factory takes all the aerial cables along the right side). Remove the "water blue" universal Fakra housing from one end of the cable to just leave the bare SMB connector. That makes it easier the thread through and is not needed for connection to Japanese designed head units which don't seem to use Fakra standards at all. Use a trim tool to prise up the front edge of the C pillar trim and pull out the first clip. That will allow you to start pulling the A pillar trim off. After the first few clips have been pulled out it will be possible to carefully pull the end of the trim out from behind the C pillar trim. When all the clips are removed the bit that covers the actual A pillar is removed by pulling upwards.

Remove the roof trim panel that is to the rear of headliner again by using a trim tool to start and then pulling the clips out. Pull the ends of the right hand rubber concertina grommet out of the body and the hatch (it easily pops out and back again). The bare SMB end of the aerial cable then has to follow the line of the existing aerial cables through the grommet into the body through a hole that the existing cables pass through so that it is visible above the headliner. Then carefully pull the cable through and tape it to the existing cables behind the A pillar trim as you go.

Remove the cover of the fuse panel at the end of the dash which will allow you to see the cable at the bottom of the A pillar.

Remove the trim above the pedals so that you can thread the cable above the steering column and up to behind the HU. Tape or zip-tie the cable up so it can't rub on the steering column.

When the cable has been run from the amp module to the head unit, replace all the trim panels and push the ends of the concertina grommet back into the hatch and body.
 

Attachments

#2 ·
Great write up of a really good mod for those of us with a DAB capable head unit.

Maybe self evident but could be helpful if you add to the bill of materials a few spare trim clips when ordering the other parts from Audi. They are easily deformed or lost when working with the trim panels and cost next to nothing.

I agree that basic soldering skills are needed. Here is a good primer:
http://en.m.wikipedia.org/wiki/Soldering#Flux

If the repair cables are wicked first and you use a little flux at the solder pads, it is quite easy to place the wicked wire on the pad and apply a little pressure on it with the soldering iron until it melts and the wire solder onto the pad. At least it went easily for me. I dreaded that part having struggled with soldering on unused oxidized solder pads on glass before, but as there already was a nice blob of solder on the pads from the previous fixing of the snipped OEM wires, the job was made easy.

If you don't know how to solder an easier option may be to use silver conductive wire glue instead (cold solder). That works well also and you don't have to invest in soldering equipment for this one job. Make sure that oxidized surface is carefully scraped away from the existing solder on the pads before gluing on the wires so that you get a good connection.
 
#4 ·
Great thread mate... Definitely bookmarked this for later in the year when i give this a go!

Managed to sort out the reception on my standard aerial so happy with the radio for now!!

Sent from my iPhone 5s using Tapatalk
 
#5 ·
Using this guide, I've managed to work out a much cheaper alternative that doesn't need the Audi aerial amplifier.

1. Pick up a generic DAB amplified aerial - I used this one but I guess this would work with others too. http://www.dynamicsounds.co.uk/conn...ct27uv62-universal-dab-digital-radio-windscreen-glass-mount-antenna-aerial.html
2. Carefully remove the self adhesive antenna, by peeling it away from the black amplifier unit. It exposes a small contact strip that we will solder to later.
3. Cut the aerial lead at the amplifier end - you need to do this to run the cable.
4. Plug the aerial lead to the headunit and run it to the back window. As my headunit is in the glovebox, I chose to run it on the left side (right hand drive) up the A-Pillar and across the roof, attaching to the existing wiring loom as I went go with some 6mm Tesa tape. Thread through the rubber grommet on the tail lift and across to the contacts on the window - this bit was a bit of a pain as it's pretty tight and goes round a corner, and I had to use a wire to hook it through. This lead had about 75cm of slack so plenty to work with.
5. Pop open the amplifier box with a thin-blade screwdriver and solder the aerial lead back on once you've cut it to an appropriate length. You will need to remove the remnants of the old connection first.
6. Solder a 10cm piece of wire to the thin metal contact that was originally touching the self-adhesive antenna.
7. Put the cover back on the amplifier box. You can use the soldering iron to melt a small slot for the wire to come out of the amplifier box when you put it back together.
8. Attach the amplifier box to the tail lift (I used some 3M VHB tape), and attach the grounding sticker. You'll need to scratch away a little paint down to the metal so that it has a contact.
9. I had some bits of old wire already attached to the window but they were easily removed with a desoldering pump. Solder your wire to the middle of the 3 contacts on the window. It's the one that connects to the 3 pronged aerial about 8cm tall - as far as I can work out, this is the DAB antenna and you don't need to connect to anything else.
10. Test and then put your car back together!

I've now got perfect reception on all my DAB stations for ÂŁ20 and a couple of hours work :lol:

Many thanks to the OP for doing the legwork for this as I probably wouldn't have attempted it had it not been for his findings.
 
#9 ·
Dedicated, separate DAB and AM/FM aerials will always give a stronger signal than a shared one.

The info on the Autoleads PC6-536 DAB/FM splitter says that it is only suitable for use with non-amplified AM/FM aerials. The Mk2 TT has an amplified FM aerial and therefore the PC6-536 won't be suitable.
 
#10 ·
Ok cheers. Might just stick with a windscreen antenna for now, then tackle kitmonkeys take on the DIY over the summer.

I expect its just the fear of the unknown, and when I see all the wires etc you and him refer to it probably wont be as bas as I envisage. That said, I haven't done any real soldering worth talking about since A-Levels at school some 15 years ago!
 
#11 ·
Having recently purchased my 2011 TTS I was really surprised that DAB wasn't an OEM option on the car and having had it in both my A5 and A4Allroad (both older than my current car) and not really wanting to swap out my RNS-E for aftermarket, I decided to fit the Autodab SWC kit. This struck me as the best option as I like to keep things looking original and this is all hidden behind the dash with nothing on show…. except the awful stick on aerial!

Having read this excellent how to detailing how to use OEM parts and connecting into the aerial elements in the rear screen, then the later post below detailing how to do the same job with a stripped down stick on aerial, I opted to do the latter on the basis that a stick on aerial is supplied with the Autodab kit and I wouldn't need to buy anything in addition. (As a side note, the how to post links to a passive stick on aerial and the one supplied is active so it also has a power cable running to it. I tested it without the booster attached and had a lot of interference so I think the powered version is essential).

First, I peeled off the stick on element and popped open the amplifier case. I was then left with the bare circuit board as below (note the copper tag that the aerial was attached to):

Image


Then using the soldering iron I removed the copper tag and in its place attached approx. 10cm of cable (as below), used the soldering iron to melt a slot in the plastic case and reassembled. Unlike the above guide I didn't detach the aerial cable from the circuit board, but I did release the amplified power pin from the molex multiplug for ease of routing, particularly through the rubber cable grommet from the boot lid to roof.

Image


Image


Image


Finally before fitting I wrapped all the various cables with Tesa tape as I hate rattles.

Image


Essentially I then followed the above guides. The only issue I had was that my soldering iron didn't appear to be hot enough to release the wire tails on the rear screen (special super strong solder maybe?) and I ended up just soldering over the top and checking for continuity with a multi-meter.

Image


I used some wire to route the cables through the grommet along and down the A pillar until I got just beyond the steering column and Arghhh!! The cable was too short to get behind the stereo by about 6 inches! Thankfully using the piggyback looms supplied I was able to feed the tails from behind the stereo and in to the driver's footwell. I then popped the molex back on, connected everything up and bingo, everything works.

So far as signal strength goes, it isn't quite as good as my previous oem dab set ups, however we're talking 95% as opposed to 98% and the great thing is (IMHO) everything looks completely stock. Anyway I hope this assists anybody thinking of doing the same.
 
#12 ·
Thank you for the guide(s) - I also did this mod at the weekend, but since my HU doesn't have DAB and I didn't want to change it, I went with the Autodab SWC kit as well.

I found feeding the cables through the boot lid grommet and into the car fairly straightforward, only challenge was when I found that the cables were slightly too short to get to the rear of the HU. However, there isn't enough space behind the HU for the Autodab box anyway, so I attached the box (cable tie on each corner mount) to the a big empty space underside of the dash just to the left of the steering wheel and ran the piggyback leads into the HU.

All sorted and I seem to have pretty good signal, at least no drop-outs on my regular commute to work :)
 
#13 ·
I have this DAB antenna unit to go along with the HU install.

I am thinking to follow the above where people have used aftermarket solutions to tap into the centre prong of the three antenna points.

https://www.streetsoundvision.com.au/alpine-kae-242da-active-dab-screen-antenna

Should work... right? Has anyone done the mod using this specific Alpine module?

I'm pretty sure i will need an extension to be able to run the antenna feed from front to rear hatch so what lengths have you guys used?

Thanks!
 
#14 · (Edited by Moderator)
I thought I would add my recent experience retrofitting a Kenwood DAB aerial.

First, as mentioned in the first post, don't do this unless you have decent soldering skills - or at the very least, don't overestimate your skills as I did mine. I made the mistake of wicking the existing solder off, and wicked the contacts away as well. Just use the solder that is there, and don't put too much temperature in - just get the wire attached, and get out.

Second, I found with the latch cover, after removing the two screws in the hand hold pocket in the bottom trim to allow the trim to move a little, if you squeeze the latch cover in at both sides, then push the top of the cover forward (toward the front of the car) while pulling down, it flexes the cover just enough for the securing plastic prongs to clear the engagement holes they go into. The cover will still put up a bit of a fight, but will slide off. This makes getting the bottom trim cover off alot easier.

IMG_6954.jpg
IMG_6955.jpg


With regard to the DAB aerial on the back window, while pondering the value of my ongoing existence after initially having a perfectly functional join only to decide it could be better and proceeding to burn the two contacts off, I noticed another aerial in the left corner of the window that looked distinctly like a DAB aerial. The only problem with this aerial is that it shares it's trace with the rear demister.

IMG_69772.jpg


Given my new found power to remove the trace material from the window, and that I had already killed two of the contacts, I figured there would be no harm in breaking the trace connecting this aerial to the demister, and using it as the DAB aerial. I "rubbed it out" using the soldering iron, but while writing this I realised it would have been much cleaner and easier using wick.

IMG_6979.jpg


After confirming no continuity with a multimeter from the demister to the aerial, sure enough, the aerial works quite well. Despite an embarrassingly ugly looking contact workaround, I get better reception from this aerial than I did with the small 3 prong aerial connected to the second pad.

For those that want to know, the terribly un-elegant solution I used for the burnt off contacts, was soldering the wire onto some copper tape, sticking the copper tape contact to the window using 3m double sided tape, then using electric paint to bridge the gap between the copper and the trace. To be clear, don't assume this is a fallback position if you stuff something up - I don't know how long this will last, and it's my intention to go back in later and do a proper job. If anything, this is a clear lesson in what not to do - just do it right the first time.

What burnt off contacts look like
IMG_69762.jpg

Mil-spec repair
IMG_69782.jpg

Finished product
IMG_69802.jpg
 

Attachments

#15 ·
The parts required are:-

Aerial amplifier module 8J8035225J
Connector housing 1C0973119B
2 x Repair wires 000979009E
Fixing screw N90775001
Fixing clip WHT000025
3.5m Aerial cable with universal Fakra connectors VAG 000098654A
Zip ties and/or cloth loom tape

The repair wires and aerial cable are across brand VAG part numbers and may be cheaper at a Skoda dealership!
Sorry to resurrect such an old thread, I was hoping someone would be able to advice on two parts which I am trying to source.

Regards the actual aerial amplifier module, does the part have to be 8J8035225J? I can only seem to find 8J8035225 (without the J), which looks exactly the same. Are they the same part?

Regards the aerial cable, would any generic Fakra to SMB aerial work or does it have to be the VAG part? The part number listed above seems to bring up a Fakra to Fakra aerial wire, whereas I would need an SMB connection to go into the back of my headunit, like photographed in the OP's instructions.
 
#21 ·
Just adding an update here in case anyone is using this thread as a reference.

Buying and using 8J8035225J as suggested by the OP is the way to go but it is expensive as only new modules from Audi appear to be available.

As @kitmonkey suggested you can use a modified stick on windscreen DAB antenna module instead which at ~ÂŁ10 is a much cheaper option but the challenge here is to get the earth plane for the antenna to make an effective connection to ground. If you don't do this properly, you won't get the best reception.

A middle ground option is to buy a secondhand 8J8035225 module (note no "J") to use it just for its case. These are widely available secondhand for around ÂŁ10 because every coupe has one. Having removed the circuit board from inside (which is of no use) you can mount the circuit board from the windscreen stick-on antenna in its place. The windscreen circuit board is a little too wide for the case but if you shave it down a tad it'll fit nicely. Shaving down the circuit board exposes the ground plane so as you push it into the new case you ensure a good earth connection. You also need to take an earth wire out to the fixing that attaches the case to the top left hand corner of the tailgate. If like me, you buy a module that has been cut from the donor car rather than unplugged it'll come with Farka connectors attached and you can reuse one of those for the aerial feed. Once you've mounted the new module to the tailgate but before you put the plastic cover on it's a good idea to check that approx. 12 volts from your head unit is reaching the module (10.7 volts in my case) when the head unit is on.

Mounting the stick-on windscreen DAB module in this way improved my DAB reception from reasonable to perfect and it looks stock - although no-one can see it once the trim is replaced :)
 
#23 ·
Hey!

I'm looking to connect to the rear screen of my TT for the DAB aerial.

I'm planning on connecting to the rear screen with one of the cheap stick on units (but by cable rather than actually sticking it to the screen)

Would anyone be able to tell me which of the three contacts I should connect to for DAB?

I see someone here used the middle one and someone else used the left?

I don't suppose all three is a good idea? :LOL:

Thanks!
 
#24 ·
I admit I omitted to say which contact I used and having gone out to the car I can't check which one I did use without removing the rear screen trim. Since that trim is several generations parentless to remove and get back it's staying.

I know I connected to the centre of the "Trident" of tracks on the screen and using the photo earlier in this thread as reference that means connecting to the leftmost pad.

All three is not a good idea, just one and only one but do make sure you also connect to a good earth on the tailgate itself.
 
#26 ·
It's pretty good but then I've never had a DAB car radio that didn't drop out somewhere.

I suspect the Audi original one as described at the beginning of this post is the best option as it will have been designed to match the antenna wires in the rear screen but I don't use DAB enough to justify the ÂŁ100+ price tag.