Audi TT Forum banner

Reversing Camera on the Xtrons PB78ATTP

8.1K views 6 replies 2 participants last post by  Steve in Ireland  
#1 · (Edited by Moderator)
01-launcher.jpg
I thought I might as well add a reversing camera since the head unit supports one. (Most of what I say here will be relevant to any brand, and I hope it will be helpful.)

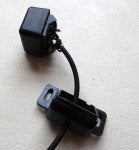
You can buy the Xtrons-branded camera for about £25, or an identical generic one for about £8. I chose the latter. Actually, there are three main styles of cheap camera. One is integrated into a replacement number plate light, but my early Mk2 TT has screwed-on lamps, not the clip-in ones which came later, so that camera won't fit directly.

The other two are what you might call "square" and "bullet" types. I bought the square style, intending to attach it to the tailgate lip. Some have infra-red LEDs. Mine doesn't.
02-instructions.jpg

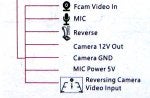
The Xtrons "manual" is pretty terse, but there's a connection diagram, plus all the wires are individually labelled (in English, plus some Chinese). The reversing camera video input is the expected yellow phono connector, but there was no description for the pink wire labelled "REVERSE", however I e-mailed Xtrons support, and they confirmed that, as I had hoped, it's an output, providing 12V to the camera when reverse is selected and the ignition is on.

03-connections.jpg
 

Attachments

#2 · (Edited by Moderator)
04-reverse-power.jpg
The cameras all seem to come with an identical, long connecting cable, which has yellow phono plugs (male) at each end for the video, but also a bare red wire to carry power. So it was simply a matter of soldering pink to red at one end (the photo shows it pre-solder, pre-insulating tape, for testing) and red to red at the other. The second red is attached to a DIN power plug (5.5mm barrel). There's no need to connect its black earth wire to anything, since the video earth is continuous anyway.
04-reverse-power.jpg

The camera itself has a fixed wire going to a yellow female phono connector and red DIN power socket. Note that this means that if you were going to install the camera from the outside, you would need a hole big enough to get the phono connector through, which would be about 12mm -- pretty large.
 

Attachments

#3 · (Edited by Moderator)
I took the glove box off, which allowed me to thread the long cable from the back of the head unit down to the passenger footwell. I was then able to tuck the cable between the carpet and the bottom edge of the centre tunnel trim, without having to take it off.

I lifted out the rear bench seat and ran the cable along an existing part of the wiring loom, which goes into the boot area.
06-rear-seat.jpg
 

Attachments

#4 · (Edited by Moderator)
As I said, my initial idea was to put the camera on the tailgate lip, but when I looked at how I was going to do that, it would have meant taking off a LOT of the trim, including the C-pillar, and I didn't even know if the phono connector would fit down the rubber gaiter of the tailgate wiring. And there would probably be a lot of poking and probing in constricted places. So I thought about it for a day.

I came back to it, and wanted to see if there was access from the boot to the bumper, so I pulled off the rear boot trim (it pops off by pulling it vertically up). That gave me the idea to simply pull off a section of the tailgate rubber seal, and thread the camera wire through, then re-seat the seal. I suppose what you might do to improve that arrangement is to cut a "U" for the wire into the edge of the metal, so that the rubber is completely undistorted when you replace it.
07-rubber.jpg
 

Attachments

#5 · (Edited by Moderator)
I put the camera roughly in place and turned on the ignition, and everything was working perfectly. Except the image was upside-down! I hadn't quite thought that through. The camera, as delivered, is intended to attach to a downward-facing, horizontal surface, and I had put it on a vertical one. Fortunately, the bracket part of the camera can be popped off and rotated 180°.
08-camera-split.jpg

So it all works, and it's quite a neat job.

09-result.jpg

10-rear-view.jpg
 

Attachments

#6 ·
Thanks for posting Steve. This is something I'd like to do. My car has an after market rear sensor at present but despite being a high quality professional installation, it's way too sensitive so it bleeps (loudly) when still some way from the obstacle.

Mine's a roadster so I'll have figure out how to route the cables.
 
#7 ·
By the way, the Xtrons has settings to mirror-image the reverse camera, and to paint grid lines, exactly like the ones my camera provides. This means that you don't need a specific reversing camera like mine. Any 12V camera will work.

Just for a laugh, I changed the setting to re-mirror my already mirrored rear view, to see if you can manoeuvre with the direct view. I certainly couldn't!