

Lots of people say that installing a rear view camera is straightforward, I managed to make it quite a performance so I thought I'd post what I did wrong.
I thought about adding this post to the big rear camera install thread but that is mostly about RNS-E whereas this post contains many specifics to the Xtrons Android unit.
The camera I used was the cheapest I could find that claimed to be Audi specific (£8). It works fine but is not without some problems, firstly the fit is a bit loose for my taste and secondly when fitted about 40% of the view is obscured by the boot lid lip. I'll cover what I did about this at the end.
The camera has three connections: 1) A video connection which obviously has to go through the car to the head unit. 2) A power lead to supply 12V to the camera 3) a power lead for the number plate LED. The latter is the easiest to deal with as it can be tapped into the old number plate lamp wire. I chose to leave the original connector intact so that the original number plate lamp could be quickly replaced. The new LED is a different colour and seems not as bright so I have a small concern that the MoT man might not like it. Photo below

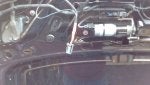
The 12v camera power lead was my biggest mistake. I spent quite some time feeding it down the boot conduit, removing the tail-light and then tapping into the reverse light bulb power and earth. If you do this the camera either doesn't work at all or flickers (when with the engine running) as the CAN unit plays around the supply voltage as part of its diagnostic testing. There are other posts that cover this and they suggest using a relay as a solution. There is however a better solution for the Xtrons unit as it has an output that provides +12V when the car is in reverse. It's a pink wire labelled 'reverse'. but be careful as there is another wire with a similar label that is the reverse signal TO the unit, which is used on non-CAN cars. On the camera that I bought there is a spare wire in the long camera lead (making 3 in total). If you connect one end to the pink wire from the head unit and the other end to power plug (centre pin) on the camera power plug then the job's a good 'un. There is no need to connect the power plug earth as it is internally connected to the camera signal earth. This is a much neater and simpler solution than using a relay.
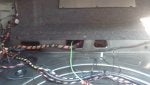
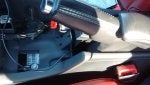
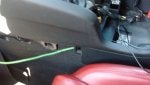
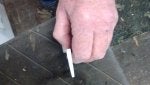
Running the signal cable was quite time consuming. Others suggest running it down the sills, but I wanted to run it down the centre console as I wanted to run one of the USB cables back the other way so a would have a USB charging point for my phone by where the original phone adaptor used to be. Quite a lot of trim needs to be removed / loosened but it is not that difficult. Be careful levering out the gear lever surround, I managed to get my lever under the metallic bit instead of the entire piece and pulled a bit of it off. The following pictures show my threading tool (a short length of 6mm earth wire - green and yellow) in various places.


Do fully test it before you put the trim back!
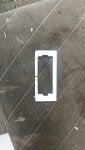
The poor fit of the camera was annoying at first but actually forced me to think about the best alignment of the camera. I made a spacer from uPVC (easy to work) that both lowered and angled the camera slightly. I set it to clear the boot lip at the top and just have the bumper in vision at the bottom. The picture give some idea of the thickness and the angle.


Hope this saves others from making the same mistakes.
Edit
Here are some pictures of the camera installed and the view in the screen (sorry not worked out how to do screen captures on the Xtrons yet.) The camera alignment seems to have moved a bit between the trial fit and the final installation. As you can see I have a small amount of the boot lip showing but you can just see the rear bumper in the bottom left corner. I'll try it for a bit and see if it's worth having another go at the spacer. For info the MG is approx 10ft away.
I thought about adding this post to the big rear camera install thread but that is mostly about RNS-E whereas this post contains many specifics to the Xtrons Android unit.
The camera I used was the cheapest I could find that claimed to be Audi specific (£8). It works fine but is not without some problems, firstly the fit is a bit loose for my taste and secondly when fitted about 40% of the view is obscured by the boot lid lip. I'll cover what I did about this at the end.
The camera has three connections: 1) A video connection which obviously has to go through the car to the head unit. 2) A power lead to supply 12V to the camera 3) a power lead for the number plate LED. The latter is the easiest to deal with as it can be tapped into the old number plate lamp wire. I chose to leave the original connector intact so that the original number plate lamp could be quickly replaced. The new LED is a different colour and seems not as bright so I have a small concern that the MoT man might not like it. Photo below
The 12v camera power lead was my biggest mistake. I spent quite some time feeding it down the boot conduit, removing the tail-light and then tapping into the reverse light bulb power and earth. If you do this the camera either doesn't work at all or flickers (when with the engine running) as the CAN unit plays around the supply voltage as part of its diagnostic testing. There are other posts that cover this and they suggest using a relay as a solution. There is however a better solution for the Xtrons unit as it has an output that provides +12V when the car is in reverse. It's a pink wire labelled 'reverse'. but be careful as there is another wire with a similar label that is the reverse signal TO the unit, which is used on non-CAN cars. On the camera that I bought there is a spare wire in the long camera lead (making 3 in total). If you connect one end to the pink wire from the head unit and the other end to power plug (centre pin) on the camera power plug then the job's a good 'un. There is no need to connect the power plug earth as it is internally connected to the camera signal earth. This is a much neater and simpler solution than using a relay.
Running the signal cable was quite time consuming. Others suggest running it down the sills, but I wanted to run it down the centre console as I wanted to run one of the USB cables back the other way so a would have a USB charging point for my phone by where the original phone adaptor used to be. Quite a lot of trim needs to be removed / loosened but it is not that difficult. Be careful levering out the gear lever surround, I managed to get my lever under the metallic bit instead of the entire piece and pulled a bit of it off. The following pictures show my threading tool (a short length of 6mm earth wire - green and yellow) in various places.
Do fully test it before you put the trim back!
The poor fit of the camera was annoying at first but actually forced me to think about the best alignment of the camera. I made a spacer from uPVC (easy to work) that both lowered and angled the camera slightly. I set it to clear the boot lip at the top and just have the bumper in vision at the bottom. The picture give some idea of the thickness and the angle.
Hope this saves others from making the same mistakes.
Edit
Here are some pictures of the camera installed and the view in the screen (sorry not worked out how to do screen captures on the Xtrons yet.) The camera alignment seems to have moved a bit between the trial fit and the final installation. As you can see I have a small amount of the boot lip showing but you can just see the rear bumper in the bottom left corner. I'll try it for a bit and see if it's worth having another go at the spacer. For info the MG is approx 10ft away.


") I've linked your post to the original Reverse Camera post under the section " ALTERNATE REVERSE CAMERA OPTIONS" on the first page.
I've linked your post to the original Reverse Camera post under the section " ALTERNATE REVERSE CAMERA OPTIONS" on the first page.


