I have successfully managed to replace my own DIS LCD screen today after about four hours work. It wasn't at all fun with the thought in the back of my mind that should it all go wrong I'd need a new instrument cluster. Fortunately it went ok although I don't think I'd fancy doing it again.
I ordered the replacement LCD screen from http://joseisi.tripod.com it cost £68 and took four days to arrive from Portugal.
EDIT 06/11/11 - Since writing this post I have been informed by Nate that the LCD screen has become available from http://www.akspeedo.com/audi-vw-speedom ... r-shop.php for the much cheaper price of £30.
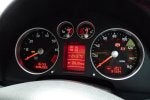
This is what my screen looked like on a good day, sometimes it was far worse

To get the instrument cluster out of the car I had to loosen the cover under the dashboard above the foot well. To do this there were several screws to remove on the right of the dash, behind the fuse box cover, and a few in the foot well area. Once removed the panel could be pulled towards myself and unclipped from below the instrument panel. Once unclipped the two screws holding in the instrument cluster could be removed. The manual says that you need a special tool to unclip the top of the instrument cluster but I just rotated mine out starting at the bottom.

With the instrument panel free I disconnected all three connectors at the back by operating the levers on each of them which pulls the connector out automatically.

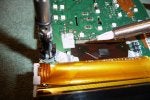
With the cluster out the next job was to strip it down. I removed all of the case screws and then separated the casings, removing both the front and back covers just leaving the clocks. The next part was really nasty; I prised the needles off with a screwdriver (not a nice job at all).

With the needles off I unclipped both small LCD screen metal clips and removed the temperature and fuel gauge moving coil meters (one of which broke slightly). With these removed I was able to unclip the large white panel revealing the LCD connections. The LCD was then unclipped and de-soldered by pulling the ribbon gently while heating it with a soldering iron set at 300oC.

I cleaned up each of the connection pads on the PCB with a smearing of flux and a soldering iron.

The connections of the new LCD were then also smeared with a touch of flux before being taped down into position on the board. Each connection was then given a brief touch with the iron to solder them.

With the ribbon soldered in place the LCD was carefully clipped into position and the cluster reassembled in the reverse order to being stripped down.

Refitting the needles was a bit of a pain in the neck. The speedo and rev counter both automatically reset themselves back to zero when plugged back into the car. To refit these I plugged the cluster back in and pushed the needles back on pointing to zero. I then unplugged and plugged back in to make sure they were still at zero (this took a few attempts). The fuel and temperature gauges were even worse. They naturally sprung back past their end stops with the needles off. The only way I found to do these was to use Vag-Com to run an instrument test which drives the fuel and temperature gauges to max and then holds then at half way. When held in the half way position I pushed them on pointing to half (this again took a few attempts). I suppose another way to have done this would have been to get the temperature to 90oC and stick the pointer on at 90 and have a full tank of fuel and point the fuel one to full.

With the pointers all in the right position the casing was reassembled, after a good clean, and refitted into the car. Fortunately everything still worked and the end result was pretty good.

I don't think that the contrast of the replacement screen is quite as good as the original but at least I can read all of the information on the display now without having to guess what it might say!
I ordered the replacement LCD screen from http://joseisi.tripod.com it cost £68 and took four days to arrive from Portugal.
EDIT 06/11/11 - Since writing this post I have been informed by Nate that the LCD screen has become available from http://www.akspeedo.com/audi-vw-speedom ... r-shop.php for the much cheaper price of £30.
This is what my screen looked like on a good day, sometimes it was far worse
To get the instrument cluster out of the car I had to loosen the cover under the dashboard above the foot well. To do this there were several screws to remove on the right of the dash, behind the fuse box cover, and a few in the foot well area. Once removed the panel could be pulled towards myself and unclipped from below the instrument panel. Once unclipped the two screws holding in the instrument cluster could be removed. The manual says that you need a special tool to unclip the top of the instrument cluster but I just rotated mine out starting at the bottom.
With the instrument panel free I disconnected all three connectors at the back by operating the levers on each of them which pulls the connector out automatically.
With the cluster out the next job was to strip it down. I removed all of the case screws and then separated the casings, removing both the front and back covers just leaving the clocks. The next part was really nasty; I prised the needles off with a screwdriver (not a nice job at all).
With the needles off I unclipped both small LCD screen metal clips and removed the temperature and fuel gauge moving coil meters (one of which broke slightly). With these removed I was able to unclip the large white panel revealing the LCD connections. The LCD was then unclipped and de-soldered by pulling the ribbon gently while heating it with a soldering iron set at 300oC.
I cleaned up each of the connection pads on the PCB with a smearing of flux and a soldering iron.
The connections of the new LCD were then also smeared with a touch of flux before being taped down into position on the board. Each connection was then given a brief touch with the iron to solder them.
With the ribbon soldered in place the LCD was carefully clipped into position and the cluster reassembled in the reverse order to being stripped down.
Refitting the needles was a bit of a pain in the neck. The speedo and rev counter both automatically reset themselves back to zero when plugged back into the car. To refit these I plugged the cluster back in and pushed the needles back on pointing to zero. I then unplugged and plugged back in to make sure they were still at zero (this took a few attempts). The fuel and temperature gauges were even worse. They naturally sprung back past their end stops with the needles off. The only way I found to do these was to use Vag-Com to run an instrument test which drives the fuel and temperature gauges to max and then holds then at half way. When held in the half way position I pushed them on pointing to half (this again took a few attempts). I suppose another way to have done this would have been to get the temperature to 90oC and stick the pointer on at 90 and have a full tank of fuel and point the fuel one to full.
With the pointers all in the right position the casing was reassembled, after a good clean, and refitted into the car. Fortunately everything still worked and the end result was pretty good.
I don't think that the contrast of the replacement screen is quite as good as the original but at least I can read all of the information on the display now without having to guess what it might say!