Plastic Drain Skirt - How I repaired mine
Sorry some of the photos were taken when I had completed the job and realised I could help others by posting the procedure (so in some photos you can see the rivets after the repair
Any questions please ask, as I am sure I have made this far simpler than it was
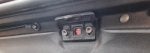
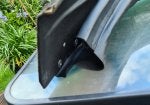
1 Open the roof approx 10inch from the windscreen this drops the rear of the roof showing the rear trim panel held in place by 6 Torx bolts, 8 (i think) gray plastic studs these run in horizontal plain going through the trim into the body work.

2 Remove the 6 (i think) black plastic studs these run vertically round the lip of the trim from the curve section towards the doors


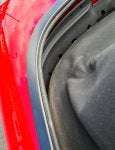
3 From inside the car remove the rubber strip from the metal channel Pull the rubber strip/drain skirt upwards out of the metal channel, at the base of the hood, this allows the drain skirt to fall free

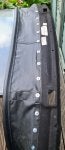
4 From inside the car remove the drain skirt
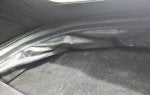
5 From outside the car remove the rear trim panel
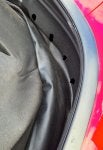
6 Clean all traces of the original tape, I use a craft knife held at 90degrees to the surface, then use something like Panel wipe (used in preparing paint work to make sure there is no traces of glue left) from both the rear trim panel and the drain skirt.
7 I used double side 3M body tape applied to the rear trim panel, then making sure the drain skirt is the correct way round apply this to the tape
8 I then used 5mm by 12mm wide based rivets along with 5.5 internal diameter by 18mm washers, I have found these help to reinforce the taped joint (I intend for it to last). Using a 5.5mm HSS drill, applying steady pressure drill through the rear trim panel and the drain skirt. Slow and steady is best when drilling to avoid the drain skirt/trim and or tape twisting up, I have found it best to use a new drill bit each time I have completed this repair to make sure you get a nice hole.
9 Drill one hole at a time, then feed the rivet through from the drain skirt (what would be from inside the car) through the rear trim panel, place a washer on the rivet stud then use the rivet tool to snap the rivet into place.

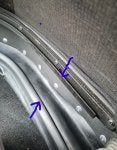
10 I completed this approximately every 10cm all the way along the join between the rear trim panel and the drain skirt.

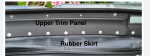
When completed and viewed from the end the drain skirt/plastic trim should look like this:

11 From inside the car feed the rear trim panel back in to position
12 From outside the car replace the Torx bolts through the rear trim panel by hand, so the rear trim panel can still be moved to help align the holes for the gray and black plastic studs can be installed
13 When all the gray and black plastic studs are in place finally tighten the Torx bolts (sorry I don't have a torque setting) I used the nominal engineering torque, for the 6mm torx bolts 8Nm for the 8mm torx bolts 15Nm
14 Inside the car install the rubber into the metal channel


15 Then close the hood
16 Sit down and relax
Sorry some of the photos were taken when I had completed the job and realised I could help others by posting the procedure (so in some photos you can see the rivets after the repair
Any questions please ask, as I am sure I have made this far simpler than it was
1 Open the roof approx 10inch from the windscreen this drops the rear of the roof showing the rear trim panel held in place by 6 Torx bolts, 8 (i think) gray plastic studs these run in horizontal plain going through the trim into the body work.
2 Remove the 6 (i think) black plastic studs these run vertically round the lip of the trim from the curve section towards the doors
3 From inside the car remove the rubber strip from the metal channel Pull the rubber strip/drain skirt upwards out of the metal channel, at the base of the hood, this allows the drain skirt to fall free
4 From inside the car remove the drain skirt
5 From outside the car remove the rear trim panel
6 Clean all traces of the original tape, I use a craft knife held at 90degrees to the surface, then use something like Panel wipe (used in preparing paint work to make sure there is no traces of glue left) from both the rear trim panel and the drain skirt.
7 I used double side 3M body tape applied to the rear trim panel, then making sure the drain skirt is the correct way round apply this to the tape
8 I then used 5mm by 12mm wide based rivets along with 5.5 internal diameter by 18mm washers, I have found these help to reinforce the taped joint (I intend for it to last). Using a 5.5mm HSS drill, applying steady pressure drill through the rear trim panel and the drain skirt. Slow and steady is best when drilling to avoid the drain skirt/trim and or tape twisting up, I have found it best to use a new drill bit each time I have completed this repair to make sure you get a nice hole.
9 Drill one hole at a time, then feed the rivet through from the drain skirt (what would be from inside the car) through the rear trim panel, place a washer on the rivet stud then use the rivet tool to snap the rivet into place.
10 I completed this approximately every 10cm all the way along the join between the rear trim panel and the drain skirt.
When completed and viewed from the end the drain skirt/plastic trim should look like this:
11 From inside the car feed the rear trim panel back in to position
12 From outside the car replace the Torx bolts through the rear trim panel by hand, so the rear trim panel can still be moved to help align the holes for the gray and black plastic studs can be installed
13 When all the gray and black plastic studs are in place finally tighten the Torx bolts (sorry I don't have a torque setting) I used the nominal engineering torque, for the 6mm torx bolts 8Nm for the 8mm torx bolts 15Nm
14 Inside the car install the rubber into the metal channel
15 Then close the hood
16 Sit down and relax