A quick how to, unfortunately I didnt take as many pics as I would have liked.. I just replaced my off-road springs with some relatively new facelift springs, but the same procedure applies for more upmarket products!
This isn't a difficult job, but involves some fairly strenuous spanner work as well as crouching down, so not for the congenitally unfit!
What you need:
21mm deep dish ring spanner or 21mm deep socket with flats on the outside + adjustable spanner, long 7mm Allen key with handle (Laser part, £3.99 from Halfords), 10, 18, 21mm sockets, 18mm ring spanner, T20 torx bit, torque wrench, spring compressors (again Laser from Halfords, £18 approx), big flat blade screwdriver, wd40, bottle jack.
Oh err... springs")
Fronts:
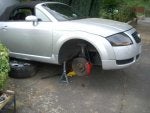
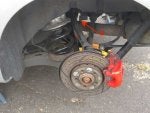
Jack her up and support safely on axlestands (note my nice shiney new ones with rubber blocks on the top). I have decided the safest and quickest way to jack her up is a single central trolley jack using a 2ft length of 4" x 3" to spread the load across the rear of the front subframe, then lower back onto axle stands under the front lifting points, keeping the jack lightly loaded.

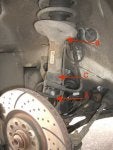
Next, remove road wheels and identify the points to undo... in this order: on both sides, locking bolt and nut in the wheel bearing housing across the bottom of the strut (A, 18mm socket and ring), drop link nut at top rear of strut (B, 18mm), clamp for brake lines in middle rear of strut (C, 10mm), passenger side only: clamp for brakepad warning cable on side of strut (20mm Torx), Xenon leveling sensor on wishbone (10mm, if fitted).

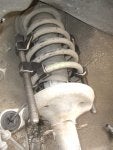
Now, with the bottle jack, raise the wishbone about 4-6" to compress the spring and fit the spring compressors.

There is precious little room and I found the easiest way to fit them was with the nut at the top... and just tighten finger tight. This is important, if you don't do this the strut will be too long to come out of the wheel bearing housing. They don't need to be done up more than finger tight as they are just to retain the loading once the housing is dropped. Keep it raised for now...

Now it is time to undo the top nut, loosen it a few turns but do not remove yet...


Its a stiffnut so is tight all the way up. Ideally you should replace it... but some loctite on refitting will suffice...
Now comes the fun and games! Firstly WD40 the joint between the strut and the wheelbearing housing. If you feel round the back there is a vertical slot in the housing. What you need to do is get a big flatbade in there and prise sideways to break the seal between the strut and the housing... if you squirt WD40 at the joint you can see it seep down when you prise the slot apart. Do this a few times ansd you will find that the WD40 will start dripping out of the bottom - then you know its all the way through!
Now lower the jack supporting the wheelbearing housing... if you are really really lucky the strut will come free but chances are it won't. What I did next is wedge the base of the bottle jack on top of the wheelbearing housing (block of wood helps) and place the end under the lip on the strut

A few pumps on the jack and the strut comes out easily...
Failing that a big hammer and a length of wood....
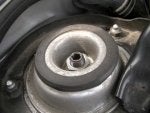
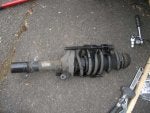
Once the bottom of the strut is free, remove the upper nut (remembering to hold the strut - two sets of hands helps here) and lift the strut clear of the car... do NOT remove the spring compressors...

Now remove the spring retaining nut, noting how it all comes apart. You will need the same tools as the top nut.

Lift the spring off and note how long it is... this is the length you will need to compress the new spring to in order to replace the retaining nut and refit the strut in the car. This is where you build up those arm muscles!
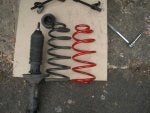
Here you can see pre-2002 (black) and post-2002 springs (red) (yes I sprayed it red, but don't bother as you can't really see it and the paint gets hacked up by the spring compressors). See the post-2002 has one less coil although it is not significantly shorter... just compresses more.

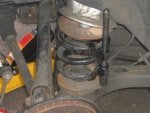
Now, compress the new spring keeping the compressors in the same orientation as they were removed from the old spring. This is to make sure the strut will go back in the car OK. Its a little tricky because the new spring has one less coil... some trial and error may be needed
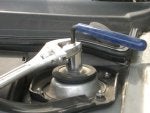
Refit the spring to the strut, tightening the retaining nut and making sure the spindle goes through the plate and is not trapping the plate (its obvious when you look at it). Refit the strut in the car by offering it up and loosely fitting the top nut, positioning the wheelbearing housing and lifting it gently with the jack to push the strut through the housing. The strut has a tab on it that must go through the slot in the housing. Refit the bottom bolt and torque to 110Nm. Now you can tighten the top nut and remove the spring compressors (if you got it just right they will be finger tight now - if not, try raising the jack a little more to compress the spring further).
Drop the jack slowly until the drop link bolt lines up and refit, torquing to 35Nm, then you can drop the jack completely. Refit everything else and you are done.
Rears:
The rears are much simpler but still need a fair amount of manual effort...

There is only one bolt to remove using a 21mm socket . Support the trainling arm with a jack and remove the bolt at the lower end of the shock absorber (A). On the passenger side remove the Xenon sensor link (10mm, if fitted) (B)

In the manual it says to fit the special spring compressors now, but we don't have these and there isn't enough room to get the normal strut type compressors in there...
The solution is to drop the trailing arm as far as it will go which will give enough room to get the compressors on. As you can see, you have to experiment to find a location where you can actually turn them as well.

Once compressed about as far as they would go I found pressing down with my foot on the trainling arm allowed it to drop another inch and the spring would come out top first. As before, note how far the spring is compressed and compress the new one the same amount or a touch more.
Refiting is the reverse of removal... but a couple of points.. the top of the spring has a green flash on it, be careful as the spring is almost symmetrical. The bottom of the spring should be up against the side of the tab on the rubber bottom mount. Early cars don't have this tab, so the end of the spring should be at 9-oclock (12-o clock being towards the front of the car).
All of this took me 6 hours today, and I ache all over, especially my right elbow - think I got RSI from all that work with the spring compressors.
This isn't a difficult job, but involves some fairly strenuous spanner work as well as crouching down, so not for the congenitally unfit!
What you need:
21mm deep dish ring spanner or 21mm deep socket with flats on the outside + adjustable spanner, long 7mm Allen key with handle (Laser part, £3.99 from Halfords), 10, 18, 21mm sockets, 18mm ring spanner, T20 torx bit, torque wrench, spring compressors (again Laser from Halfords, £18 approx), big flat blade screwdriver, wd40, bottle jack.
Oh err... springs
Fronts:
Jack her up and support safely on axlestands (note my nice shiney new ones with rubber blocks on the top). I have decided the safest and quickest way to jack her up is a single central trolley jack using a 2ft length of 4" x 3" to spread the load across the rear of the front subframe, then lower back onto axle stands under the front lifting points, keeping the jack lightly loaded.
Next, remove road wheels and identify the points to undo... in this order: on both sides, locking bolt and nut in the wheel bearing housing across the bottom of the strut (A, 18mm socket and ring), drop link nut at top rear of strut (B, 18mm), clamp for brake lines in middle rear of strut (C, 10mm), passenger side only: clamp for brakepad warning cable on side of strut (20mm Torx), Xenon leveling sensor on wishbone (10mm, if fitted).
Now, with the bottle jack, raise the wishbone about 4-6" to compress the spring and fit the spring compressors.
There is precious little room and I found the easiest way to fit them was with the nut at the top... and just tighten finger tight. This is important, if you don't do this the strut will be too long to come out of the wheel bearing housing. They don't need to be done up more than finger tight as they are just to retain the loading once the housing is dropped. Keep it raised for now...
Now it is time to undo the top nut, loosen it a few turns but do not remove yet...
Its a stiffnut so is tight all the way up. Ideally you should replace it... but some loctite on refitting will suffice...
Now comes the fun and games! Firstly WD40 the joint between the strut and the wheelbearing housing. If you feel round the back there is a vertical slot in the housing. What you need to do is get a big flatbade in there and prise sideways to break the seal between the strut and the housing... if you squirt WD40 at the joint you can see it seep down when you prise the slot apart. Do this a few times ansd you will find that the WD40 will start dripping out of the bottom - then you know its all the way through!
Now lower the jack supporting the wheelbearing housing... if you are really really lucky the strut will come free but chances are it won't. What I did next is wedge the base of the bottle jack on top of the wheelbearing housing (block of wood helps) and place the end under the lip on the strut
A few pumps on the jack and the strut comes out easily...
Failing that a big hammer and a length of wood....
Once the bottom of the strut is free, remove the upper nut (remembering to hold the strut - two sets of hands helps here) and lift the strut clear of the car... do NOT remove the spring compressors...
Now remove the spring retaining nut, noting how it all comes apart. You will need the same tools as the top nut.
Lift the spring off and note how long it is... this is the length you will need to compress the new spring to in order to replace the retaining nut and refit the strut in the car. This is where you build up those arm muscles!
Here you can see pre-2002 (black) and post-2002 springs (red) (yes I sprayed it red, but don't bother as you can't really see it and the paint gets hacked up by the spring compressors). See the post-2002 has one less coil although it is not significantly shorter... just compresses more.
Now, compress the new spring keeping the compressors in the same orientation as they were removed from the old spring. This is to make sure the strut will go back in the car OK. Its a little tricky because the new spring has one less coil... some trial and error may be needed
Refit the spring to the strut, tightening the retaining nut and making sure the spindle goes through the plate and is not trapping the plate (its obvious when you look at it). Refit the strut in the car by offering it up and loosely fitting the top nut, positioning the wheelbearing housing and lifting it gently with the jack to push the strut through the housing. The strut has a tab on it that must go through the slot in the housing. Refit the bottom bolt and torque to 110Nm. Now you can tighten the top nut and remove the spring compressors (if you got it just right they will be finger tight now - if not, try raising the jack a little more to compress the spring further).
Drop the jack slowly until the drop link bolt lines up and refit, torquing to 35Nm, then you can drop the jack completely. Refit everything else and you are done.
Rears:
The rears are much simpler but still need a fair amount of manual effort...
There is only one bolt to remove using a 21mm socket . Support the trainling arm with a jack and remove the bolt at the lower end of the shock absorber (A). On the passenger side remove the Xenon sensor link (10mm, if fitted) (B)
In the manual it says to fit the special spring compressors now, but we don't have these and there isn't enough room to get the normal strut type compressors in there...
The solution is to drop the trailing arm as far as it will go which will give enough room to get the compressors on. As you can see, you have to experiment to find a location where you can actually turn them as well.
Once compressed about as far as they would go I found pressing down with my foot on the trainling arm allowed it to drop another inch and the spring would come out top first. As before, note how far the spring is compressed and compress the new one the same amount or a touch more.
Refiting is the reverse of removal... but a couple of points.. the top of the spring has a green flash on it, be careful as the spring is almost symmetrical. The bottom of the spring should be up against the side of the tab on the rubber bottom mount. Early cars don't have this tab, so the end of the spring should be at 9-oclock (12-o clock being towards the front of the car).
All of this took me 6 hours today, and I ache all over, especially my right elbow - think I got RSI from all that work with the spring compressors.