A selection of photo's to show how easy it is (as long as you can get the f****** wheels off)...
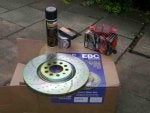
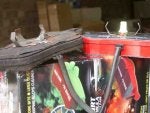
First make sure you have everything you need: pads, discs, brakedust spray, caliper paint and a 1/2" brush, copper grease, a stiff brush, lots of kitchen towel, an 18mm socket, a 7mm allen key, crosshead screwdriver, flat blade screwdriver, big hammer and several chunks of wood, brake bleed tube, bottle and bleed spanner, and some latex gloves are useful

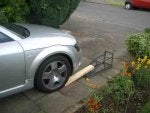
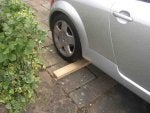
Now get the wheels off the ground.... note the use of a bit of 4 x 2 to make the ramp more gentle to avoid fouling the spoiler... this gets the car high enough to get the jack and stands under... and don't forget to chock the rears


Next remove the wheels and spray liberally with brakedust remover spray (several times and wipe off between... the stiff brush is useful too)

Remove the spring, noting how it is seated

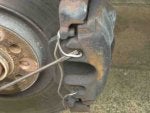
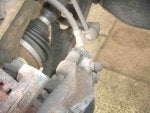
remove the guidecaps and then the guides with the 7mm allen key


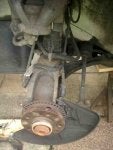
lift the caliper away, removing the old pad, and tie it out of the way to the suspension. Be careful not to twist or kink the brake cable (on the LH side you'll need to unplug the brake wear sense cable)

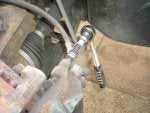
Now is a good time to push the piston back so you'll have room to put the new pads on (sorry no pic of this). To push the piston back, put the brake bleed tube on the bleed nipple and undo 1 turn then with a chunk of wood press the piston back in as far as you can (about 1/4" showing) and then lock off the bleed nipple.. do this BEFORE you paint the caliper as brake fluid and fresh paint don't get on too well...
Now remove the carrier using the 18mm socket

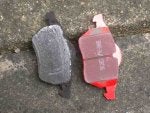
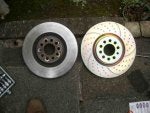
Here is a comparison of old and new pads.... these pads were on their last legs


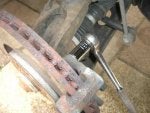
Now remove the disc...undo the screw, which needs lots of WD40, and possibly an impact driver (tip: try doing the screw up first while tapping the end of the screwdriver with the hammer...)

Replacement is the reverse of the above...
Some other tips:
You will probably need 3 coats of paint on the calipers and carriers... and then touch it up after its back on the car. Don't paint the bits where the 'ears' of the pads locate or you'll only have problems fitting them later.
The retaining spring is a bugger to get back on without scratching the paint... with the new pads in its much tighter than with the worn ones... a pair of pliers helps to pull it into position...locate the ends in the holes first then manipulate it...you're less likely to scratch the paint this way (but it'll need a touch up after anyway)
If the wheels and/or discs are 'stuck' try bashing them from behind with a hammer through a lump of wood.... don't use the hammer direct (unless its a rubber headed mallet)
Before fitting the pads, copper grease the back of the pads and the edges of the runners, also clean the guide pins with a light emery rub and grease them too. Copper grease on the back of your alloy wheel where it mates with the disc and on the wheel bolts makes it easier next time...
Whan all is done, stand back and admire...

First make sure you have everything you need: pads, discs, brakedust spray, caliper paint and a 1/2" brush, copper grease, a stiff brush, lots of kitchen towel, an 18mm socket, a 7mm allen key, crosshead screwdriver, flat blade screwdriver, big hammer and several chunks of wood, brake bleed tube, bottle and bleed spanner, and some latex gloves are useful
Now get the wheels off the ground.... note the use of a bit of 4 x 2 to make the ramp more gentle to avoid fouling the spoiler... this gets the car high enough to get the jack and stands under... and don't forget to chock the rears
Next remove the wheels and spray liberally with brakedust remover spray (several times and wipe off between... the stiff brush is useful too)
Remove the spring, noting how it is seated
remove the guidecaps and then the guides with the 7mm allen key
lift the caliper away, removing the old pad, and tie it out of the way to the suspension. Be careful not to twist or kink the brake cable (on the LH side you'll need to unplug the brake wear sense cable)
Now is a good time to push the piston back so you'll have room to put the new pads on (sorry no pic of this). To push the piston back, put the brake bleed tube on the bleed nipple and undo 1 turn then with a chunk of wood press the piston back in as far as you can (about 1/4" showing) and then lock off the bleed nipple.. do this BEFORE you paint the caliper as brake fluid and fresh paint don't get on too well...
Now remove the carrier using the 18mm socket
Here is a comparison of old and new pads.... these pads were on their last legs
Now remove the disc...undo the screw, which needs lots of WD40, and possibly an impact driver (tip: try doing the screw up first while tapping the end of the screwdriver with the hammer...)
Replacement is the reverse of the above...
Some other tips:
You will probably need 3 coats of paint on the calipers and carriers... and then touch it up after its back on the car. Don't paint the bits where the 'ears' of the pads locate or you'll only have problems fitting them later.
The retaining spring is a bugger to get back on without scratching the paint... with the new pads in its much tighter than with the worn ones... a pair of pliers helps to pull it into position...locate the ends in the holes first then manipulate it...you're less likely to scratch the paint this way (but it'll need a touch up after anyway)
If the wheels and/or discs are 'stuck' try bashing them from behind with a hammer through a lump of wood.... don't use the hammer direct (unless its a rubber headed mallet)
Before fitting the pads, copper grease the back of the pads and the edges of the runners, also clean the guide pins with a light emery rub and grease them too. Copper grease on the back of your alloy wheel where it mates with the disc and on the wheel bolts makes it easier next time...
Whan all is done, stand back and admire...