

There's been a few posts about cleaning the throttle body recently, and as I'd been experiencing similar symptoms (unsteady idling, hesitancy, jerkiness) I thought I'd give it a shot.
I have to say, I'm really pleased with the result - the response and running is silky smooth now, just like when I first got it.
If anyone hasn't had this done .... DO IT! It certainly won't hurt, and almost certainly will make a world of difference to your car's running. Don't be frightened off either. I'm a complete noob and I found it was really quite easy.
To give something back to the forum I made a photo log of my experience to provide a step-by-step guide for everyone's benefit. I hope it's useful.
3.2 V6 Throttle Body Clean - How To
This procedure must be carried out on a cold engine, because the throttle body needs to reset itself once reassembled and a cold engine is a requirement for that to happen.
The whole thing takes around one to two hours to complete
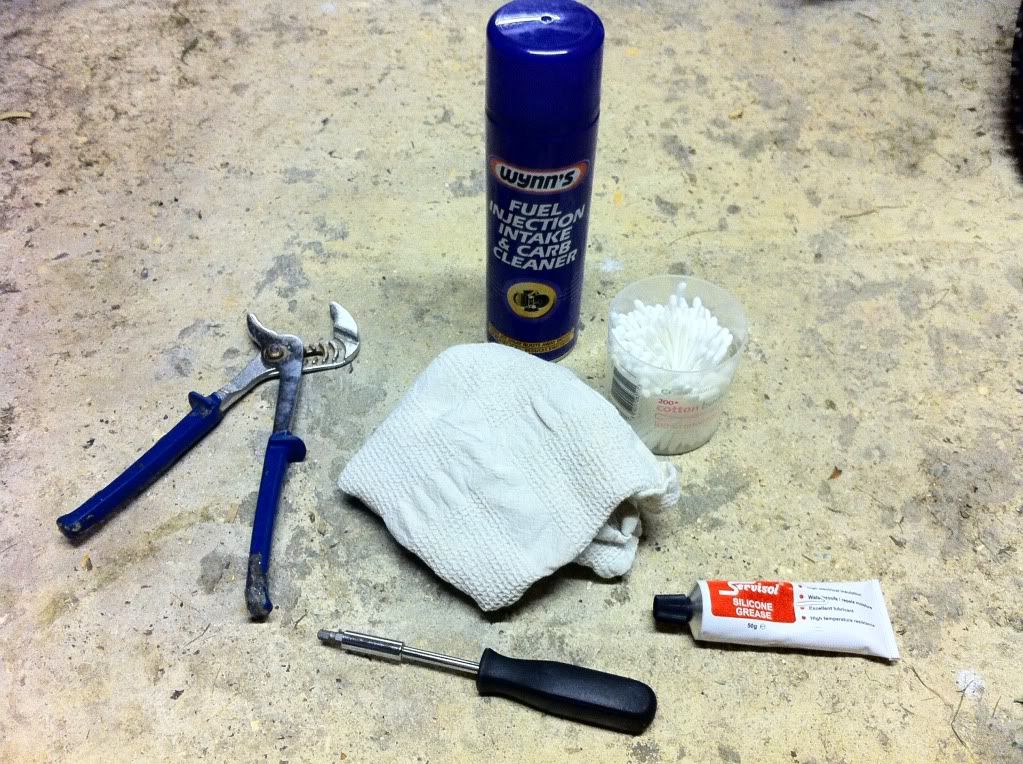
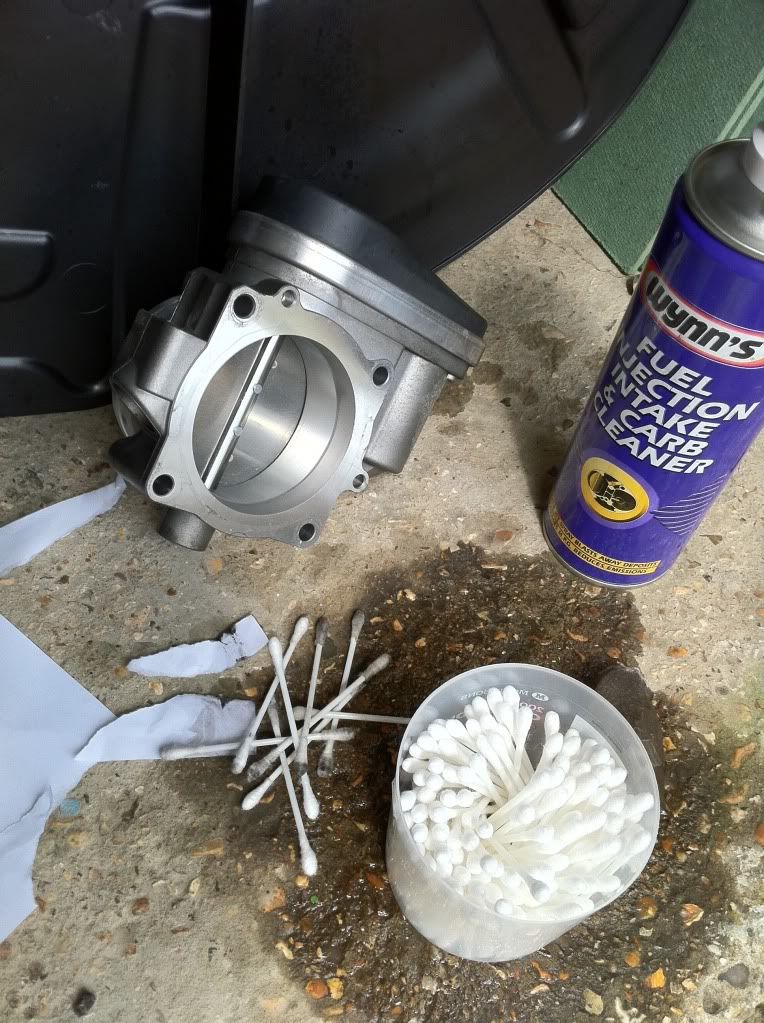
What you will need:
![Image]()
1. In order to remove the air hose you'll need to undo a spring hose clamp. A pair of channel lock pliers like in the photo will do it
2. The throttle body itself is attached by 4 hex bolts. I found that a 5mm hex bit on a long screwdriver (like the one that I bought especially) worked best because I couldn't access the very bottom bolt using an allen key, not even a long one
3. When re-assembling you should seal the O-ring gasket with a smear of Silicone Grease. I found that Maplins sell small tubes of it for about £5 (Maplin product code RE90X)
4. To do the actual cleaning you will need a can of carb cleaner, such as the one I got from Halfords (product code 294918-0) for about £5
5. A clean lint free cloth
6. Cotton buds
7. Plain white paper
8. Since you will need to disconnect the battery, make sure you have you radio code so you can re-activate it afterwards. The 4 digit code should be in your car handbook or other documentation that you received with it
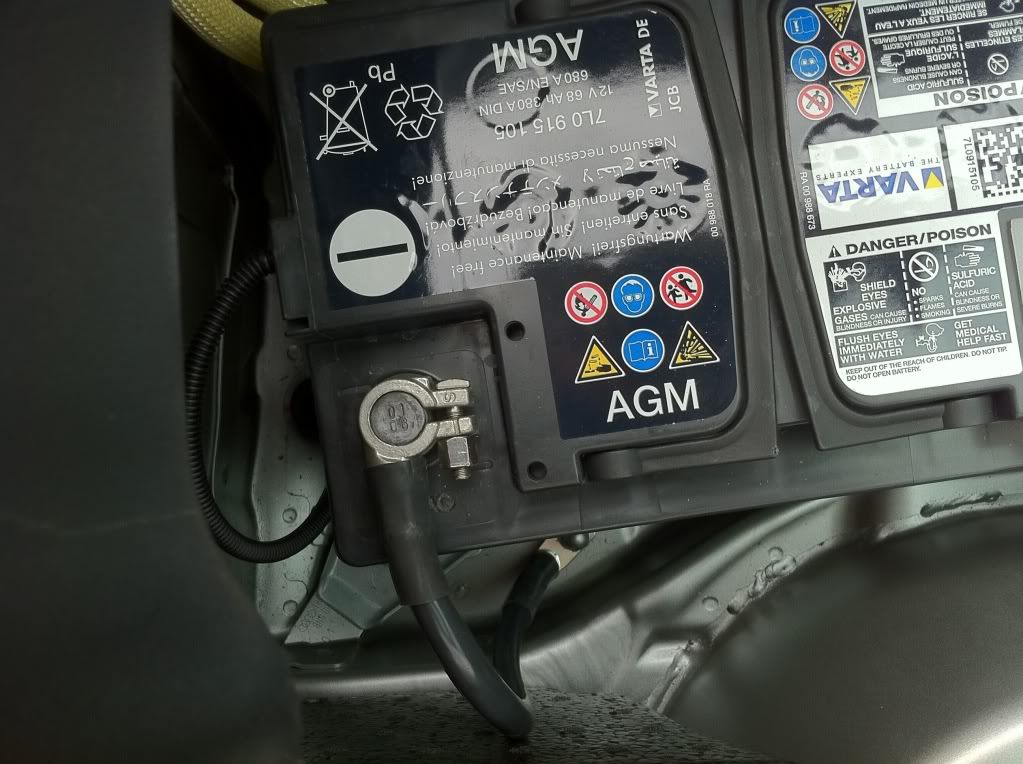
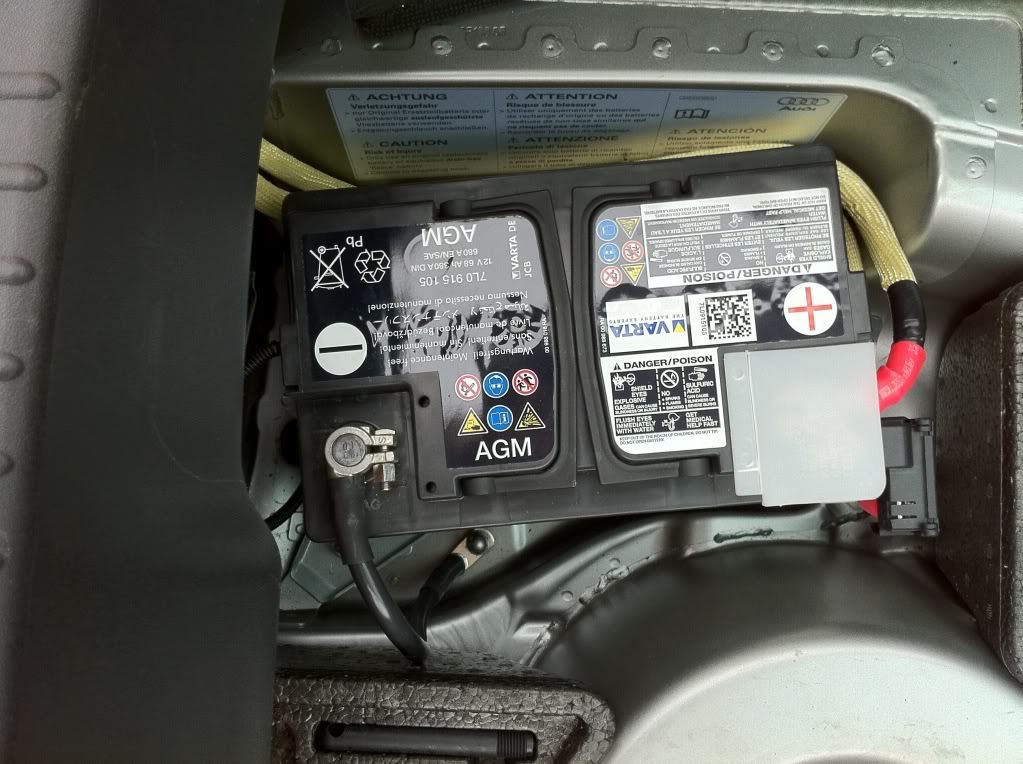
Step 1 - Disconnect Battery
Unlock the car and open the boot - in the V6 the battery is in the boot, underneath the carpet with the toolset, the latter of which has a spanner that fits the nut on the negative terminal of the battery. Disconnect the negative terminal and tuck the disconnected wire away from the terminal.
![Image]()
Place a towel across the latch of the boot so that it won't engage if you try to close the boot. Since the boot latch is battery operated, you won't be able to open the boot again to re-connect the battery so this will prevent that happening. Having said that, there is an escape mechanism that can be used to manually open the boot but it can be a bit stiff to operate.
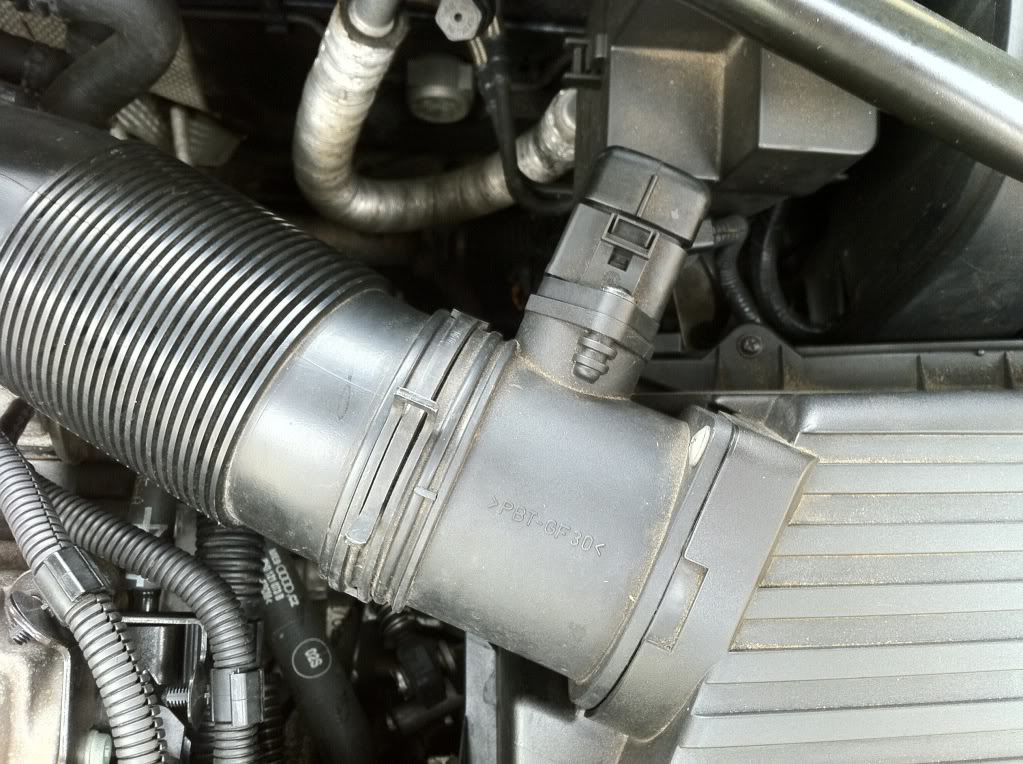
Step 2 - Unclip The Air Hose At The Airbox Side
To get the best access to the 4 bolts holding the throttle body, you need to remove the air intake hose. Start at the end shown in the picture and either use the pliers to undo the clip and pull back the pipe, or if you prefer you can undo the two screws that attach it to the air box. If you do the latter, you'll need a short philips-head screwdriver so that you can access the bottom screw easily, and I would advise to cup you hand underneath the bottom screw so that it doesn't drop into the engine when undoing it.
![Image]()
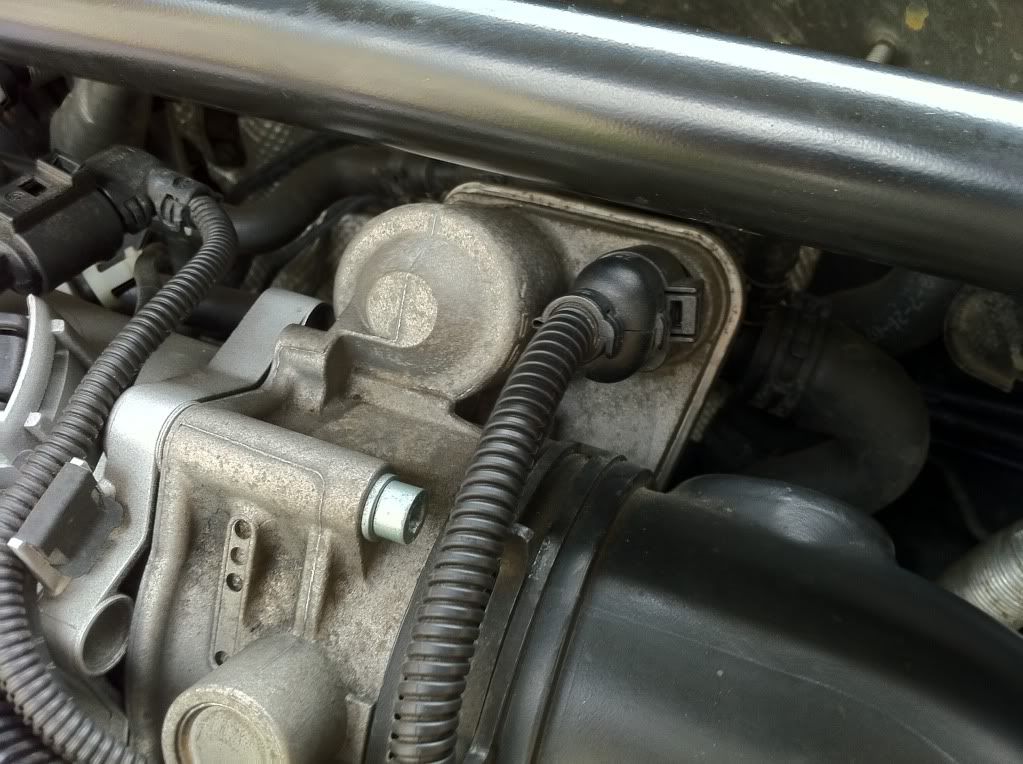
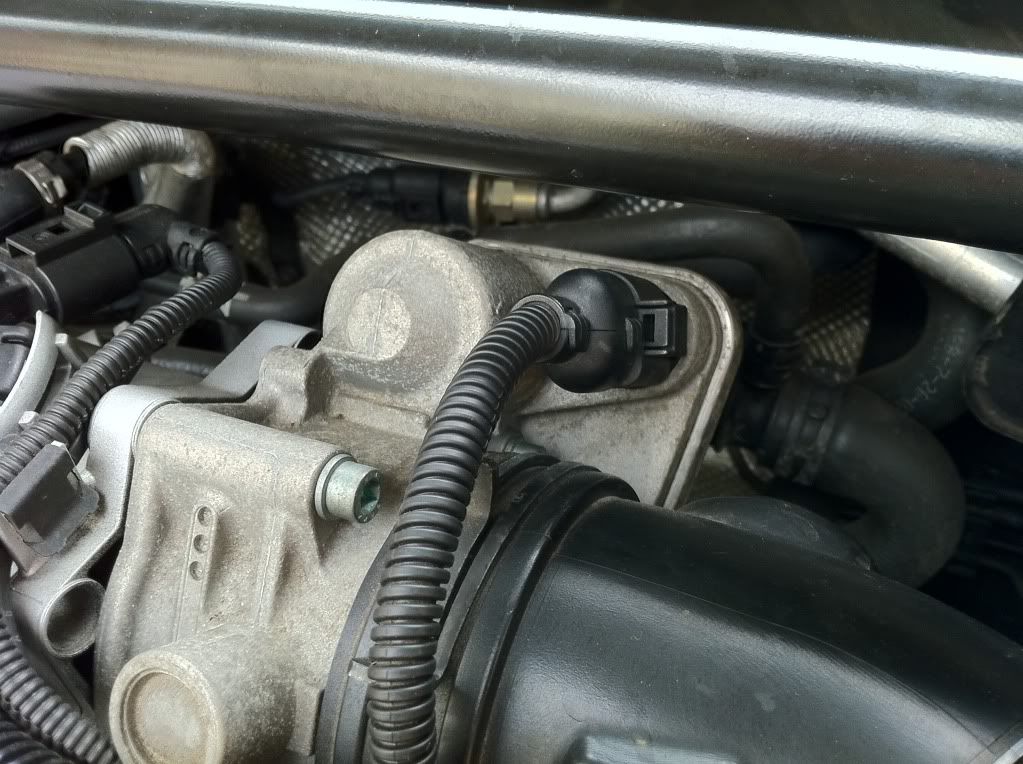
Step 3 - Unclip The Throttle Body Power Cable
Before undoing the other end of the air hose, unclip the power cable that attaches to the throttle body housing. You'll need to insert a small flat-head screwdriver and gently depress the catch while pulling the plug to remove it. You may be able to just do this by hand, as I did.
![Image]()
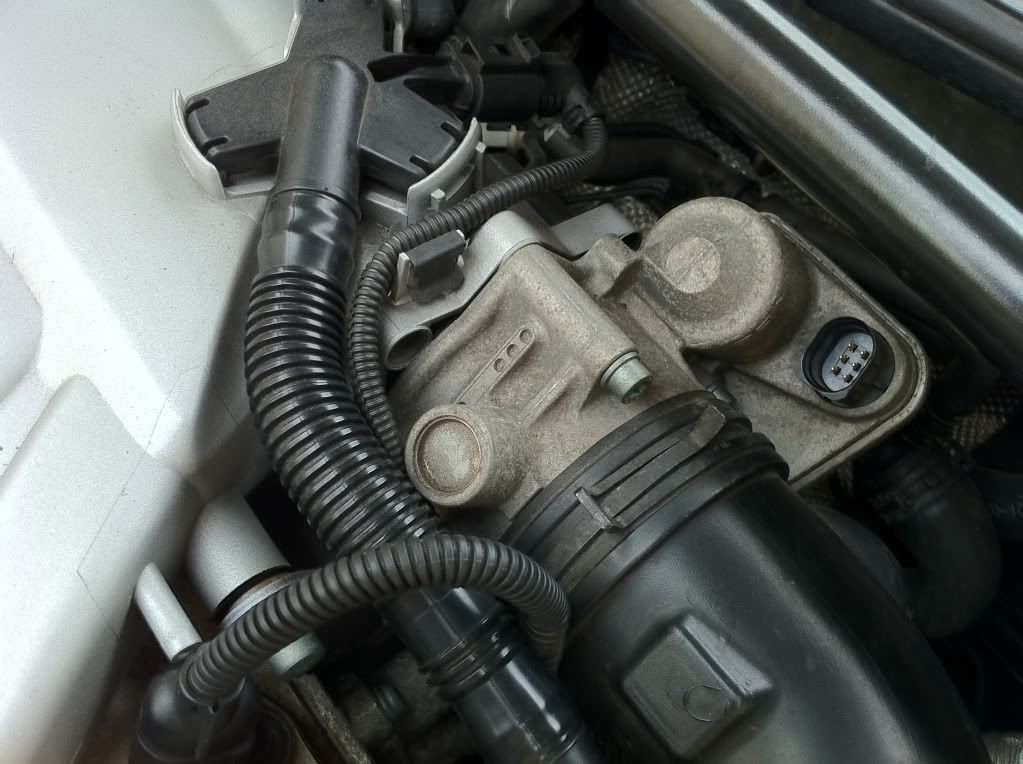
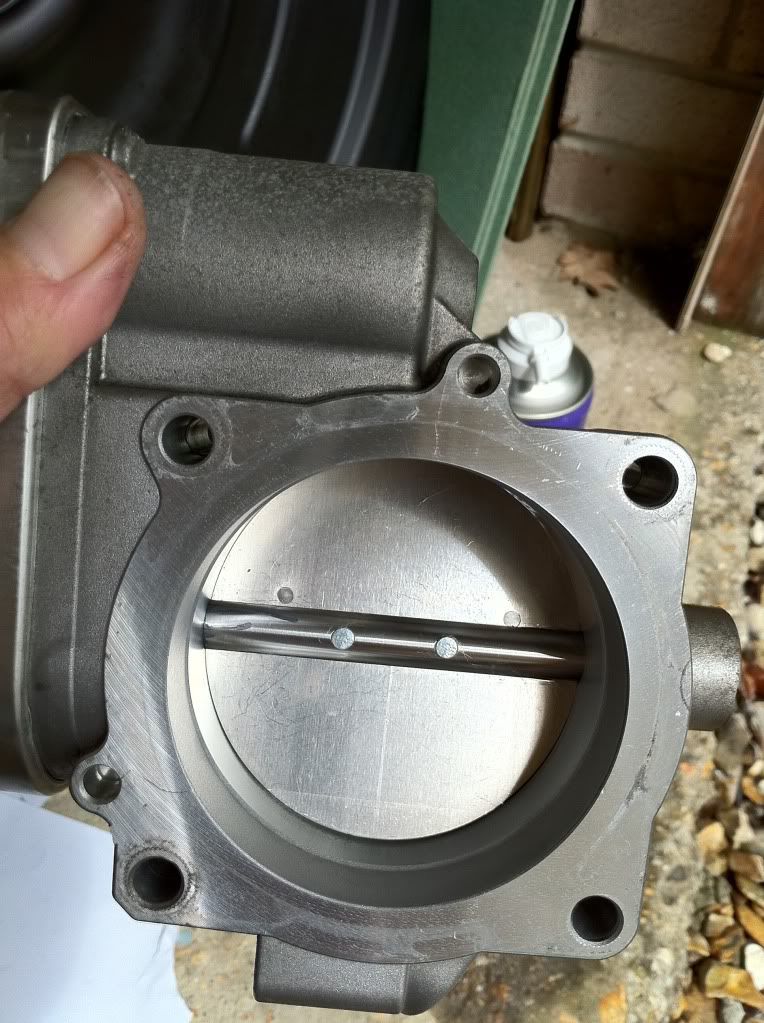
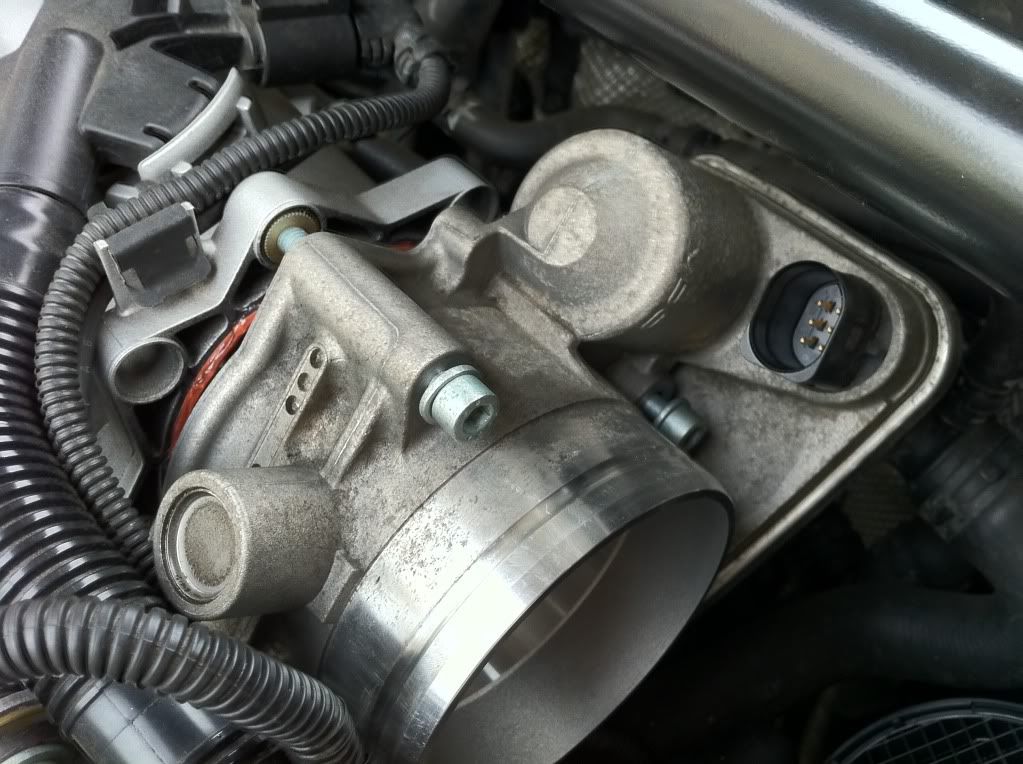
Step 4 - Unclip The Air Hose At The Throttle Body Side
With the power cable un-plugged and tucked out of the way, use the pliers again to release the air hose clip and pull the hose back to reveal one side of the throttle body internals.
![Image]()
![Image]()
(Extra points to those who note how clean it looks inside already... ok, I admit I forgot to take a photo of this so I took one after cleaning LOL)
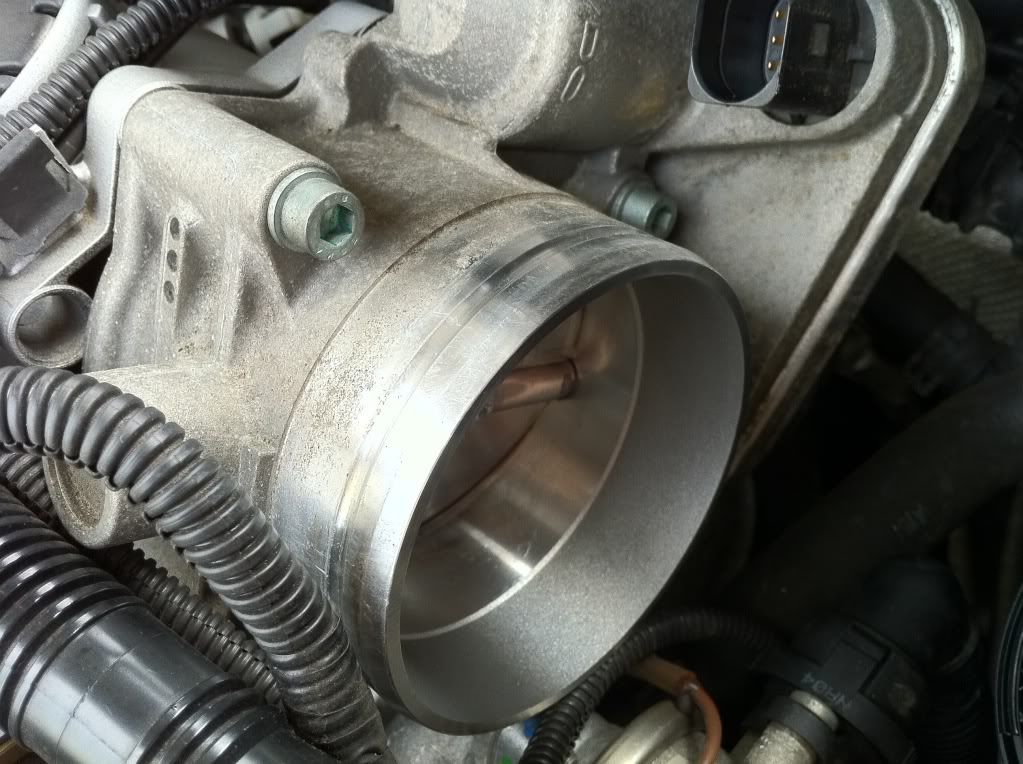
Step 5 - Undo The 4 Hex Bolts
The two top bolts can easily be accessed, but the ones on the left and at the bottom are more tricky to get to, and can potentially drop into the engine bay unless you're really careful. Use the screwdriver with the 5mm hex bit to undo the bolts and while doing the bottom two use your free hand to guide the bolts out so you don't lose them in the engine bay. Once the bolts are fully undone pull them out and put to one side.
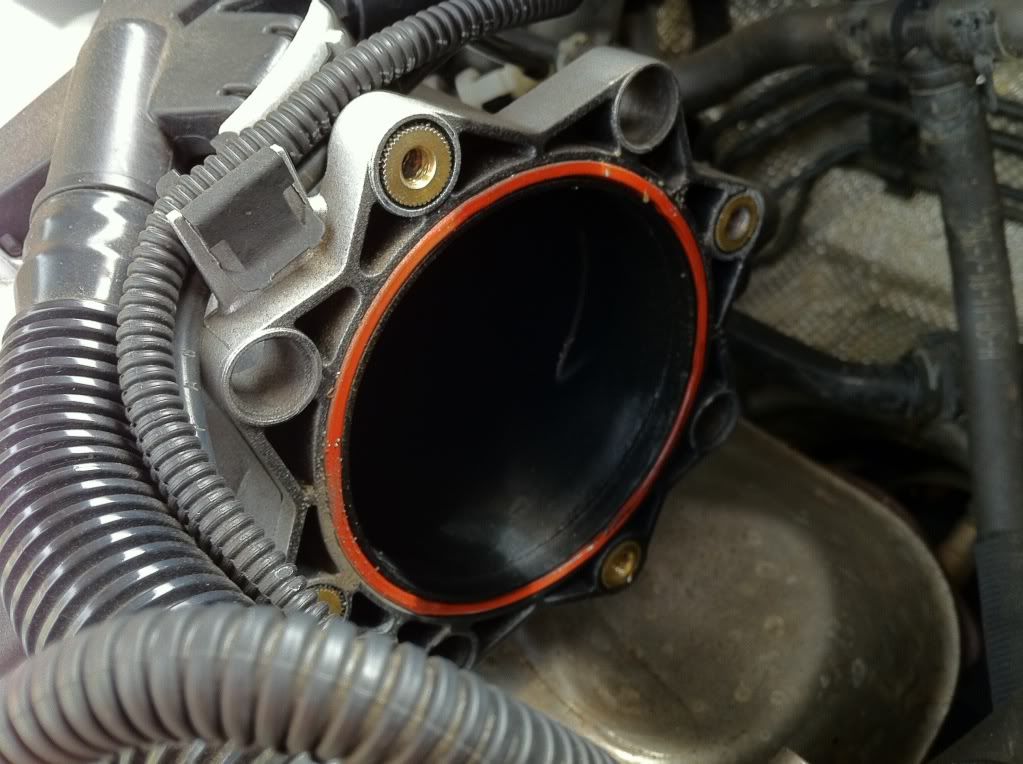
Step 6 - Remove The Throttle Body
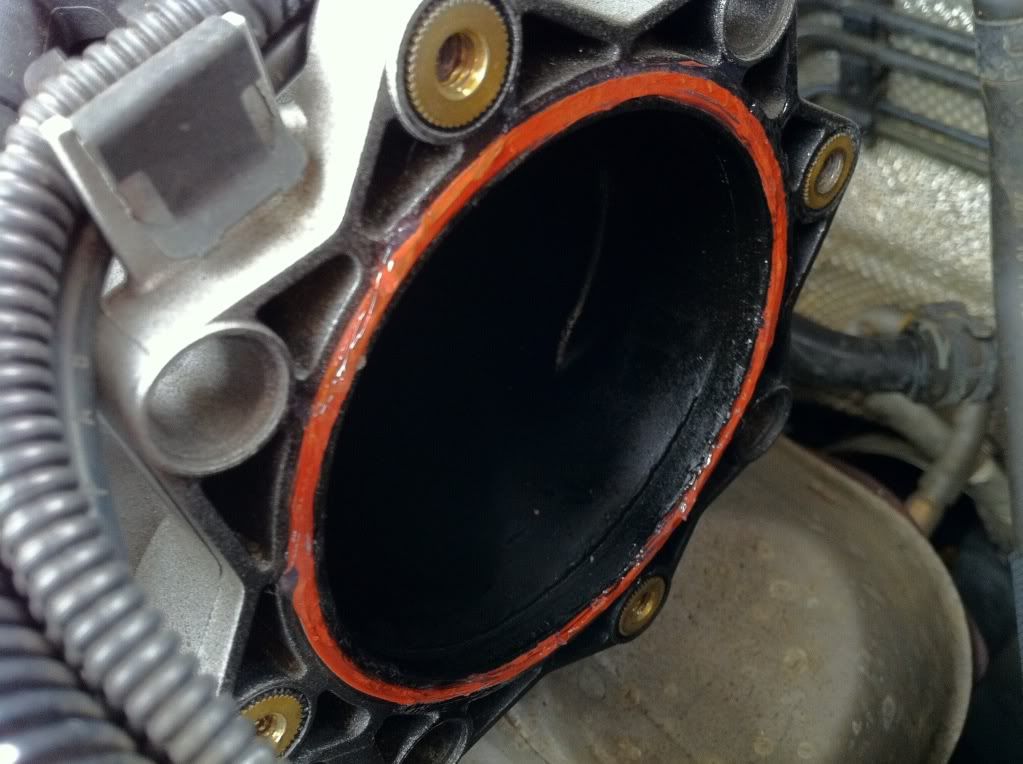
Now remove the throttle body by giving it a slight twist, then gently pulling it towards you (it's not held on by anything now) and this will reveal the air intake chamber on the other side of the throttle body.
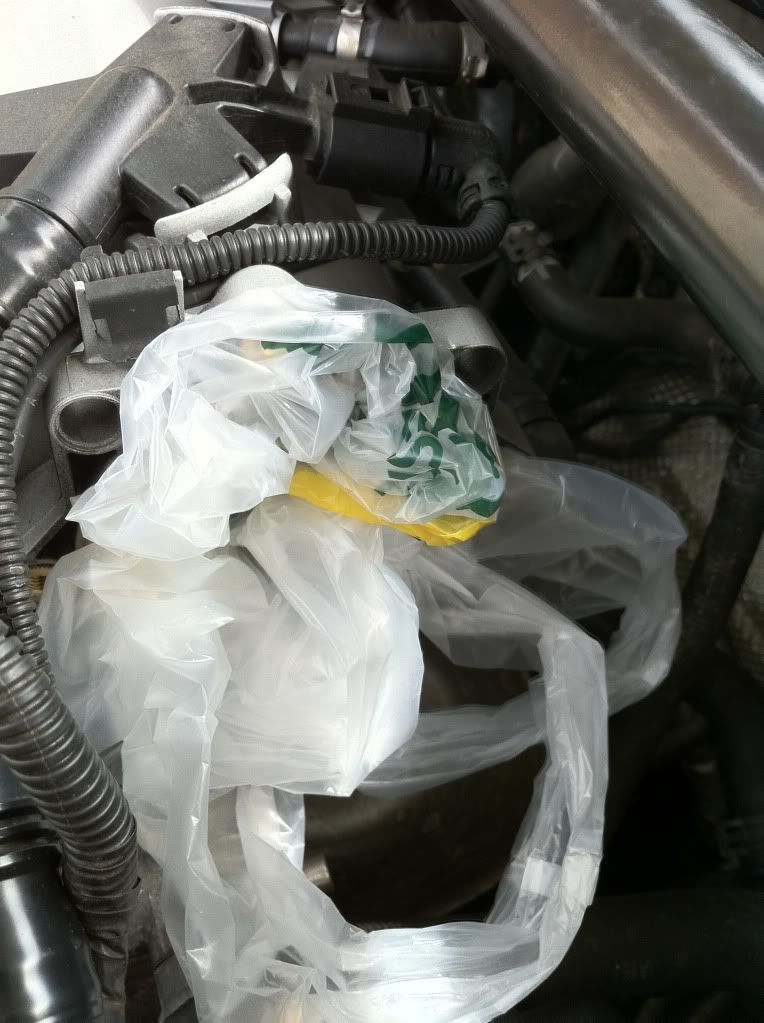
![Image]()
If anything gets into this open hole it could cause a lot of problems, so me being paranoid I would advise to block the hole temporarily to be on the safe side. I used a scrunched up plastic carrier bag and gently inserted it a little into the hole
![Image]()
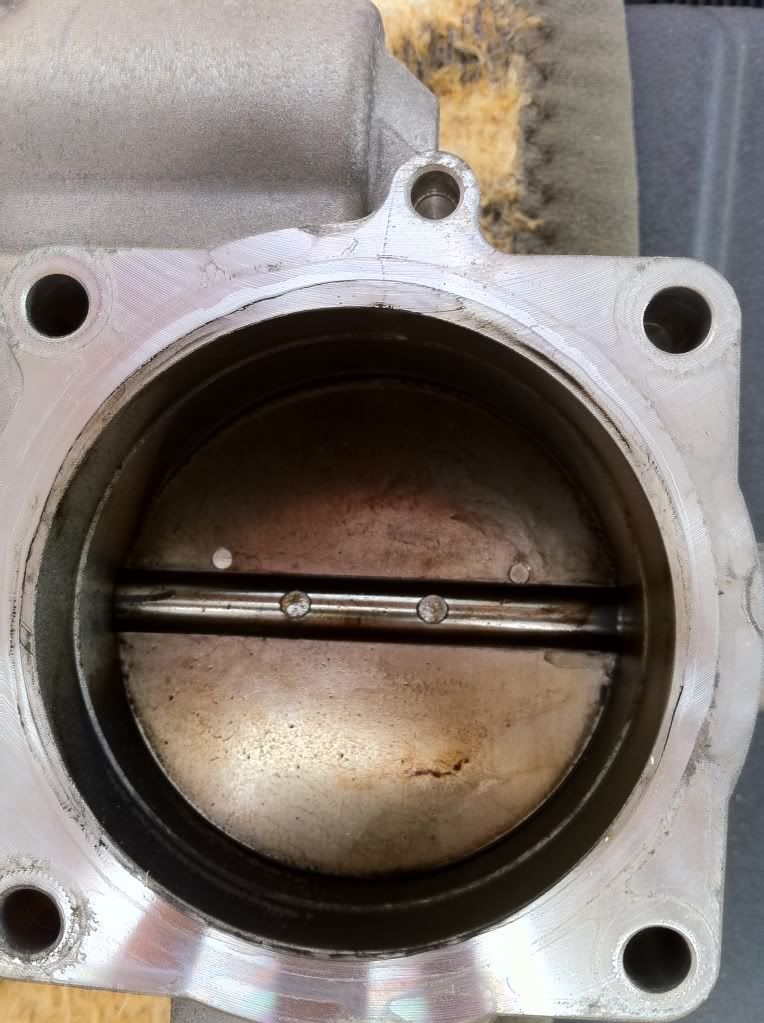
Step 7 - Cleaning The Throttle Body
Now onto the business")
As you can see, my throttle body was pretty gunked up
![Image]()
It's very important to note that during the cleaning process you should keep the cleaning solution away from the electronics of the throttle body, or you may damage it. To that end, always keep the electronics parts at the top so that the cleaning solution naturally drains downwards and away from the components. In the photo below, the electronics are housed inside the black part of the throttle body.
Also note that the throttle butterfly (the round bit in the middle) is driven by a sensitive stepper motor, so do not use any force on the butterfly or try to open it as otherwise damage may result.
Holding the throttle body in one hand with the electronics side upwards, carefully spray the carb cleaner into and around the throttle butterfly. Wait for a few secs then gently use the clean cloth to wipe away the majority of the gunk. Now gently use the cotton buds to wipe around the circumference of the throttle butterfly.
Now take a clean piece of paper and tear off a small strip. You can then feed the paper through the gap around the top and bottom of the throttle butterfly to dislodge the gunk trapped where we can't get to. Be very careful not to get too close to the hinges of the throttle butterfly or the paper will become stuck in there! And make sure to only use the cut edge of the paper to do the actual cleaning as the torn edge will be ineffective and is likely to get stuck in there. With the gunk dislodged, use a cotton bud soaked in carb cleaner to wipe around the edge and clear it up.
Repeat this process for both sides of the throttle body, then repeat the above steps until you can't get any more gunk out.
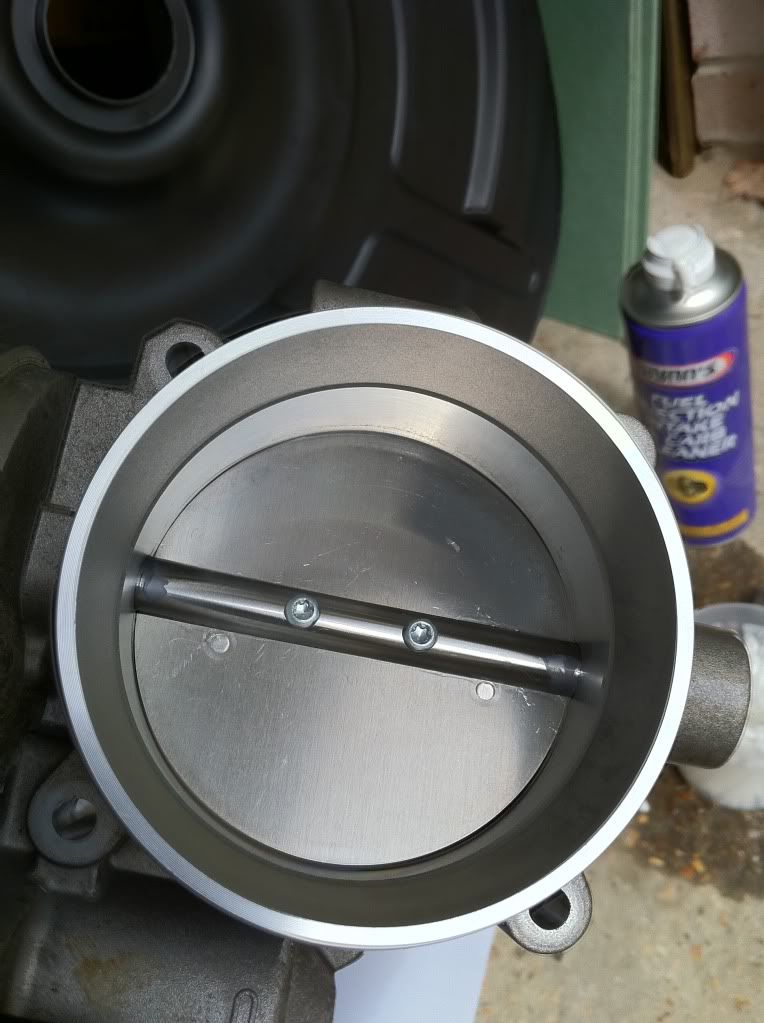
Once you're satisfied it's all clean, and still holding the electronics upright, give a final spray around with carb cleaner, let it drain off then dry off with the cloth and cotton buds. Put the whole throttle body down with the electronics upright and leave it to dry off for a while.
![Image]()
The finished result should look something like this
![Image]()
![Image]()
Step 8 - Prepare For Refitting
Remove the inserted carrier bag from the hole and give the O-ring and mating surface a quick wipe around with a clean cloth to remove any muck that's accumulated so there is a clean surface to use. Then apply a smear of Silicone Grease to the O-ring in preparation for re-fitting of the throttle body.
![Image]()
Step 9 - Refitting The Throttle Body
It's fairly tricky to re-attach the throttle body without making a mess of the Silicone Grease, so insert the top two throttle body bolts into the throttle body and use them as alignment assistants while you carefully bring the two mating surfaces together. Once the two top bolts are inserted into their holes on the other side just do them up a couple of turns to keep the body in place while you carefully insert the remaining two bolts at the bottom, then do these two up a couple of turns.
![Image]()
Once all four bolts are in, work around each bolt in turn gradually tightening each one up so that the two mating surfaces are naturally drawn together. This keeps the alignment of the throttle body straight so that the Silicone Grease doesn't get displaced and can do its job.
Finally tighten all four bolts - but don't over do it!
Step 10 - Refit The Air Hose & Power Supply
Quite simply the reverse of the procedure to disassemble, use the pliers to re-attach the air-intake side air hose, making sure it is fully seated into its original position, then plug the power supply cable back in. Then re-fit the air box side of the air hose.
![Image]()
Step 11 - Re-connect the battery
Once you're certain everything is back in place and done up correctly, re-connect the negative terminal of the battery.
![Image]()
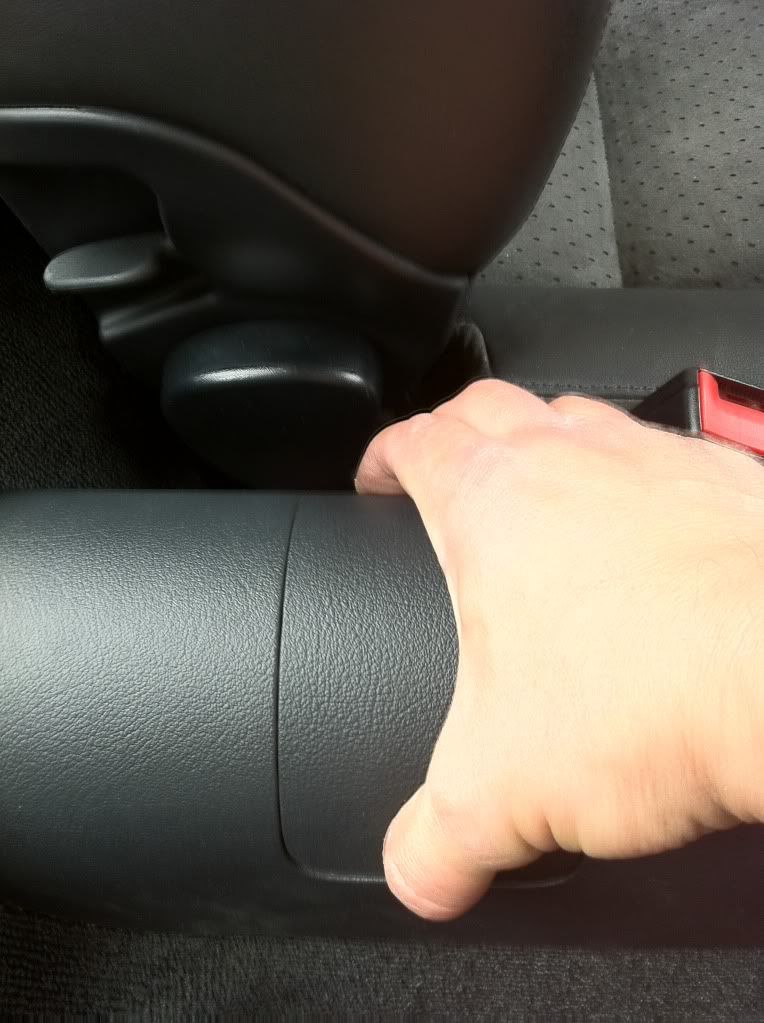
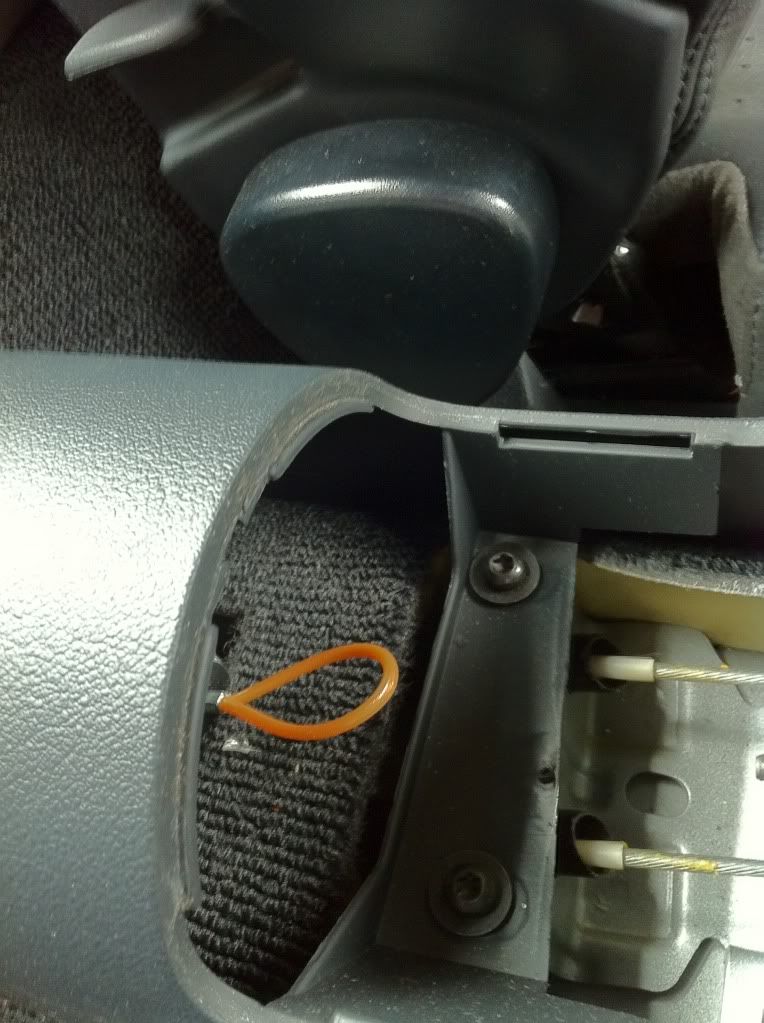
If, like me, you closed the boot then you won't be able to open it, so you' you'll need to open it using the plastic loop hidden in the centre tunnel:
![Image]()
![Image]()
Step 12 - Throttle Body Alignment
The throttle body must be re-aligned. This will happen automatically - just insert the key into the ignition and turn it until the dash lights are on... but do NOT start the car. Leave the key in this position for 5 minutes. During this time you should hear some clicking going on in the engine bay. This is the throttle body alignment doing its stuff.
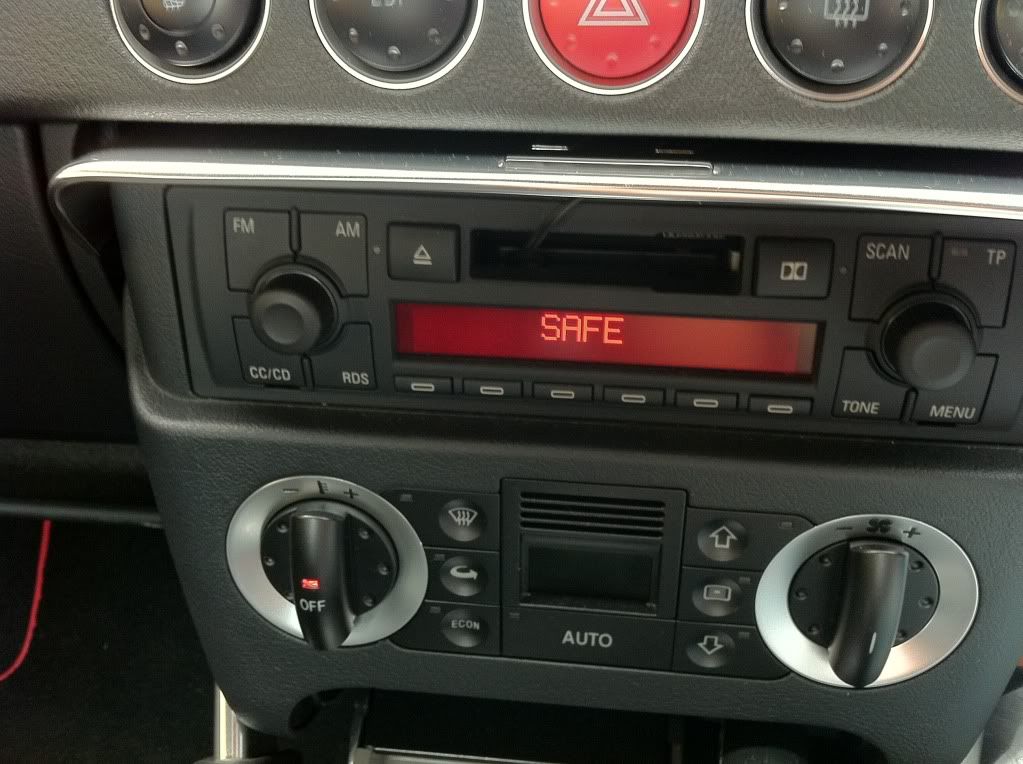
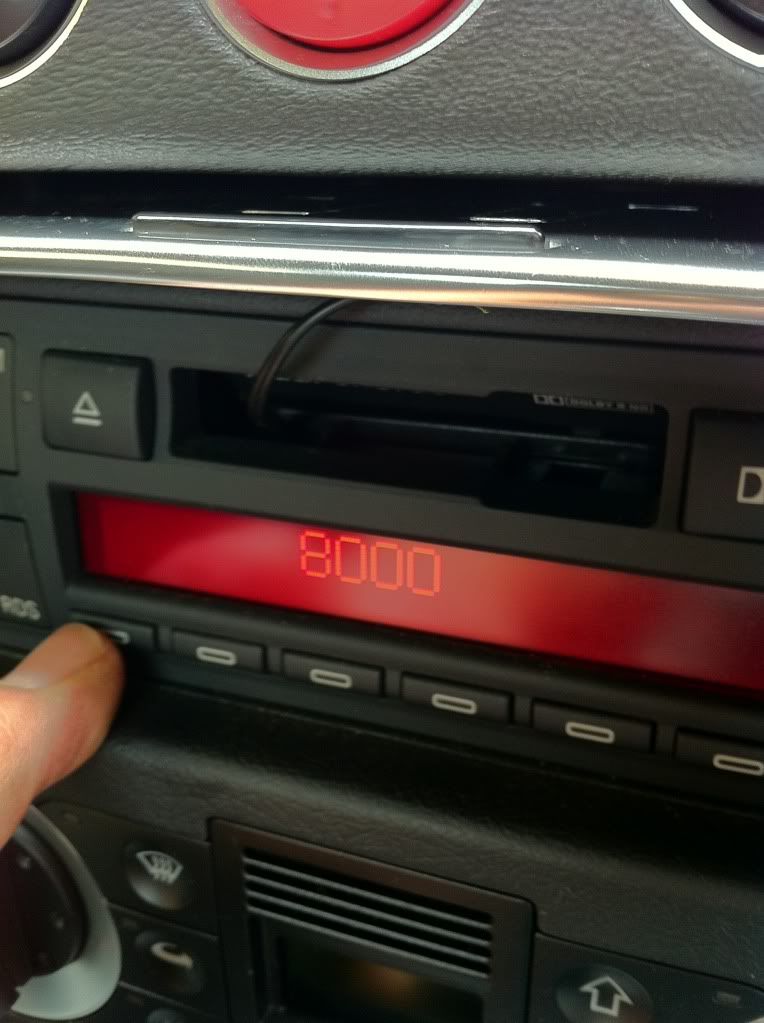
Step 13 - Radio Code
While you're waiting for the throttle body alignment to complete you may as well re-enable your radio by entering the code from your handbook. The unit will display SAFE on the front. You need to simultaneously hold down the RDS and SCAN buttons for a couple of seconds until the display changes to four zeros. Then you can use the radio station buttons from left to right to enter the four digit code - button one changes digit 1, button two changes digit 2 and so on. When you've entered your code simultaneously hold down the RDS and SCAN buttons to set the code.
![Image]()
![Image]()
Step 14 - Set The Date & Time
The clock will also be reset to your car's dash pod manufacture date, so this is another job that can be done while waiting for the throttle body reset to take place.
On the dash, pull the left silver knob (under the rev counter) towards you until the Hours flash, then turn the knob to the right or left to increase or decrease the hours. To advance to minutes pull the knob again and set the minutes, again for year, month and so on.
Step 15 - Enjoy!
By this time the throttle body reset will have taken place. Remove the key from the ignition, re-insert and start the engine. Now drive off and have fun! (Oh, and make sure the bonnet is closed first!)
I have to say, I'm really pleased with the result - the response and running is silky smooth now, just like when I first got it.
If anyone hasn't had this done .... DO IT! It certainly won't hurt, and almost certainly will make a world of difference to your car's running. Don't be frightened off either. I'm a complete noob and I found it was really quite easy.
To give something back to the forum I made a photo log of my experience to provide a step-by-step guide for everyone's benefit. I hope it's useful.
3.2 V6 Throttle Body Clean - How To
This procedure must be carried out on a cold engine, because the throttle body needs to reset itself once reassembled and a cold engine is a requirement for that to happen.
The whole thing takes around one to two hours to complete
What you will need:
1. In order to remove the air hose you'll need to undo a spring hose clamp. A pair of channel lock pliers like in the photo will do it
2. The throttle body itself is attached by 4 hex bolts. I found that a 5mm hex bit on a long screwdriver (like the one that I bought especially) worked best because I couldn't access the very bottom bolt using an allen key, not even a long one
3. When re-assembling you should seal the O-ring gasket with a smear of Silicone Grease. I found that Maplins sell small tubes of it for about £5 (Maplin product code RE90X)
4. To do the actual cleaning you will need a can of carb cleaner, such as the one I got from Halfords (product code 294918-0) for about £5
5. A clean lint free cloth
6. Cotton buds
7. Plain white paper
8. Since you will need to disconnect the battery, make sure you have you radio code so you can re-activate it afterwards. The 4 digit code should be in your car handbook or other documentation that you received with it
Step 1 - Disconnect Battery
Unlock the car and open the boot - in the V6 the battery is in the boot, underneath the carpet with the toolset, the latter of which has a spanner that fits the nut on the negative terminal of the battery. Disconnect the negative terminal and tuck the disconnected wire away from the terminal.
Place a towel across the latch of the boot so that it won't engage if you try to close the boot. Since the boot latch is battery operated, you won't be able to open the boot again to re-connect the battery so this will prevent that happening. Having said that, there is an escape mechanism that can be used to manually open the boot but it can be a bit stiff to operate.
Step 2 - Unclip The Air Hose At The Airbox Side
To get the best access to the 4 bolts holding the throttle body, you need to remove the air intake hose. Start at the end shown in the picture and either use the pliers to undo the clip and pull back the pipe, or if you prefer you can undo the two screws that attach it to the air box. If you do the latter, you'll need a short philips-head screwdriver so that you can access the bottom screw easily, and I would advise to cup you hand underneath the bottom screw so that it doesn't drop into the engine when undoing it.
Step 3 - Unclip The Throttle Body Power Cable
Before undoing the other end of the air hose, unclip the power cable that attaches to the throttle body housing. You'll need to insert a small flat-head screwdriver and gently depress the catch while pulling the plug to remove it. You may be able to just do this by hand, as I did.
Step 4 - Unclip The Air Hose At The Throttle Body Side
With the power cable un-plugged and tucked out of the way, use the pliers again to release the air hose clip and pull the hose back to reveal one side of the throttle body internals.
(Extra points to those who note how clean it looks inside already... ok, I admit I forgot to take a photo of this so I took one after cleaning LOL)
Step 5 - Undo The 4 Hex Bolts
The two top bolts can easily be accessed, but the ones on the left and at the bottom are more tricky to get to, and can potentially drop into the engine bay unless you're really careful. Use the screwdriver with the 5mm hex bit to undo the bolts and while doing the bottom two use your free hand to guide the bolts out so you don't lose them in the engine bay. Once the bolts are fully undone pull them out and put to one side.
Step 6 - Remove The Throttle Body
Now remove the throttle body by giving it a slight twist, then gently pulling it towards you (it's not held on by anything now) and this will reveal the air intake chamber on the other side of the throttle body.
If anything gets into this open hole it could cause a lot of problems, so me being paranoid I would advise to block the hole temporarily to be on the safe side. I used a scrunched up plastic carrier bag and gently inserted it a little into the hole
Step 7 - Cleaning The Throttle Body
Now onto the business
As you can see, my throttle body was pretty gunked up
It's very important to note that during the cleaning process you should keep the cleaning solution away from the electronics of the throttle body, or you may damage it. To that end, always keep the electronics parts at the top so that the cleaning solution naturally drains downwards and away from the components. In the photo below, the electronics are housed inside the black part of the throttle body.
Also note that the throttle butterfly (the round bit in the middle) is driven by a sensitive stepper motor, so do not use any force on the butterfly or try to open it as otherwise damage may result.
Holding the throttle body in one hand with the electronics side upwards, carefully spray the carb cleaner into and around the throttle butterfly. Wait for a few secs then gently use the clean cloth to wipe away the majority of the gunk. Now gently use the cotton buds to wipe around the circumference of the throttle butterfly.
Now take a clean piece of paper and tear off a small strip. You can then feed the paper through the gap around the top and bottom of the throttle butterfly to dislodge the gunk trapped where we can't get to. Be very careful not to get too close to the hinges of the throttle butterfly or the paper will become stuck in there! And make sure to only use the cut edge of the paper to do the actual cleaning as the torn edge will be ineffective and is likely to get stuck in there. With the gunk dislodged, use a cotton bud soaked in carb cleaner to wipe around the edge and clear it up.
Repeat this process for both sides of the throttle body, then repeat the above steps until you can't get any more gunk out.
Once you're satisfied it's all clean, and still holding the electronics upright, give a final spray around with carb cleaner, let it drain off then dry off with the cloth and cotton buds. Put the whole throttle body down with the electronics upright and leave it to dry off for a while.
The finished result should look something like this
Step 8 - Prepare For Refitting
Remove the inserted carrier bag from the hole and give the O-ring and mating surface a quick wipe around with a clean cloth to remove any muck that's accumulated so there is a clean surface to use. Then apply a smear of Silicone Grease to the O-ring in preparation for re-fitting of the throttle body.
Step 9 - Refitting The Throttle Body
It's fairly tricky to re-attach the throttle body without making a mess of the Silicone Grease, so insert the top two throttle body bolts into the throttle body and use them as alignment assistants while you carefully bring the two mating surfaces together. Once the two top bolts are inserted into their holes on the other side just do them up a couple of turns to keep the body in place while you carefully insert the remaining two bolts at the bottom, then do these two up a couple of turns.
Once all four bolts are in, work around each bolt in turn gradually tightening each one up so that the two mating surfaces are naturally drawn together. This keeps the alignment of the throttle body straight so that the Silicone Grease doesn't get displaced and can do its job.
Finally tighten all four bolts - but don't over do it!
Step 10 - Refit The Air Hose & Power Supply
Quite simply the reverse of the procedure to disassemble, use the pliers to re-attach the air-intake side air hose, making sure it is fully seated into its original position, then plug the power supply cable back in. Then re-fit the air box side of the air hose.
Step 11 - Re-connect the battery
Once you're certain everything is back in place and done up correctly, re-connect the negative terminal of the battery.
If, like me, you closed the boot then you won't be able to open it, so you' you'll need to open it using the plastic loop hidden in the centre tunnel:
Step 12 - Throttle Body Alignment
The throttle body must be re-aligned. This will happen automatically - just insert the key into the ignition and turn it until the dash lights are on... but do NOT start the car. Leave the key in this position for 5 minutes. During this time you should hear some clicking going on in the engine bay. This is the throttle body alignment doing its stuff.
Step 13 - Radio Code
While you're waiting for the throttle body alignment to complete you may as well re-enable your radio by entering the code from your handbook. The unit will display SAFE on the front. You need to simultaneously hold down the RDS and SCAN buttons for a couple of seconds until the display changes to four zeros. Then you can use the radio station buttons from left to right to enter the four digit code - button one changes digit 1, button two changes digit 2 and so on. When you've entered your code simultaneously hold down the RDS and SCAN buttons to set the code.
Step 14 - Set The Date & Time
The clock will also be reset to your car's dash pod manufacture date, so this is another job that can be done while waiting for the throttle body reset to take place.
On the dash, pull the left silver knob (under the rev counter) towards you until the Hours flash, then turn the knob to the right or left to increase or decrease the hours. To advance to minutes pull the knob again and set the minutes, again for year, month and so on.
Step 15 - Enjoy!
By this time the throttle body reset will have taken place. Remove the key from the ignition, re-insert and start the engine. Now drive off and have fun! (Oh, and make sure the bonnet is closed first!)


