My Mini-0806 dash cam has been having problems lately. It started off with an alarm going off alerting to a corrupted SD card. Then the camera started cycling on and off at random. So I opened it up and sure enough the Lithium Polymer (LiPo) battery had failed.
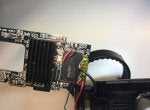
As you can see here, the normally thin silver battery capsule has ballooned to at least three times its normal thickness. I can only imagine how much pressure this has been putting on the PCB and the housing.
For anyone who's not familiar with this dash cam, you can read my review here -
Open Box Review - Mini0806 Dashcam
https://www.ttforum.co.uk/forum/viewtop ... &p=6326033

After looking over the PCB, I found the date 2014-7-15, so I'm going to assume the battery was installed sometime after this date. Most product literature I've read concerning LiPo batteries suggests they're only good for two to three years, or 300-500 recharge cycles, whichever occurs first. Fortunately new replacement batteries are still available on Alibaba, Amazon and eBay. Since I have two of these cameras, I'll replace both batteries since odds are good the second camera battery is probably going to fail sooner than later.
If the LiPo battery is dead and the power is shut off the system won't be able to shut down properly which can lead to the SD card becoming corrupted. In the case of a Mini0806 a rather loud three-beep alarm will sound when the SD card is corrupted. You can hear what that sounds like here.
If you're experiencing random problems with your dash cam, it may be worth opening it up and inspecting the battery. While this post is specific to the Mini0806, the concept for replacement is the same for basically any dashcam that uses this sort of battery technology, and you can probably find a good YouTube for your specific camera.
I have also included the Mini-0806 owners manual (English) and an article on LIPO battery swelling as PDF downloads at the bottom of the post.
LIPO BATTERY PROTECTION PCM -
When you're looking for a replacement battery, be sure it has a PCM or Protection Circuit Module. This is not a "given" feature in all LiPo batteries so check carefully when your order and double check that it's present before installing the new battery. You can see it here under the Kapton tape of the battery that failed and in a replacement battery advertisement -

View attachment 1

COMPONENTS OF THE MINI0806 DASH CAMERA -
• The camera case is a two piece, snap fit design.
• The on/off button is enclosed in, and part of, the End Cap.
• A Retaining Plate is held in place with four small screws and serves three purposes;
• Both halves of the case can only be separated once the retaining plate and base ring have been removed.
• There are five snaps on the camera-half, two on either side of the data ports and one on the end of the case.
• There are two snaps on the battery-half, both are on the end of the case, oppose the end cap
• Inside the camera are two PCBs which are connected together by three multi-pin connectors.
• One PCB contains the camera and screen, the other PCB contains the microprocessor and the battery.
• The camera speaker is mounted insde the back of the case, behind the battery PCB.
• The LiPo battery is positioned between both PCBs.
• There are two grommets on either side of the case;

DISASSEMBLY OF THE MINI0806 DASH CAMERA -
NOTE - This is for informational purposes only. If you follow these instructions, you do so at your own risk. Always wear safety glasses, handle the battery carefully and do not puncture the battery case as it may discharge Carbon Monoxide gas. Dispose of the battery properly. DO NOT REPLACE THE BATTERY WITH A HIGHER VOLTAGE OR AMPERAGE RATING!
1.) The Base Ring is rotated so the base contact foot is aligned with either the camera lens or the display screen.

2.) A narrow bladed tool is used to pry the snap release and remove the End Cap. There are two snap releases positioned 180° from each other. Only one needs to be completely released in order to remove the End Cap from the Retaining Plate. Note the small rubber bumper located on the back of the on/off button.


3.) The four screws are removed from the Retaining Plate after which the Retaining Plate can be removed.

4.) Now the Base Ring can be removed. Note the ball and spring detent which are positioned approximately 4mm to the right of the Recording Indicator LED. The Base Ring should be removed with caution so the ball and spring are not lost or damaged. The Base Ring wire is soldered to the PCB and is routed through the case, therefore it can not be removed from the camera assembly without de-soldering. Caution should be used while handing the entire camera assembly to avoid damage to the Base Ring wires.


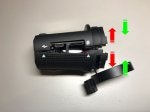
5.) The two camera case halves are separated starting on one end and prying it open like a clam shell. Note the locations of the snaps (blue triangles) around the edges of the case halves. Once the two halves are separated the two Port Grommets can be removed.
View attachment 9
NOTE - If the battery is severely swollen, it will exert pressure against the case halves and both PCBs as the case is disassembled. Care should be used to prevent damage to the three sets of connecting pins that connect the two PCBs together.


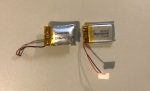
6.) The battery is secured to the PCB with a small piece of double-sided adhesive foam tape. Once removed from the PCB, the user should verify the specifications marked on the battery to ensure the correct replacement battery is ordered; (e.g. CX402030, 200mAh, 3.7V). The positive and negative wires are cut noting the location of the positive and negative connections on the PCB. Once removed and the wires de-soldered, a replacement battery can now be soldered into place. Use 1mm thick double sided adhesive foam tape to secure the battery to the PCB in the correct orientation relative to the PCB.
NOTE - Use care when handling the cases as it is very easy to damage the speaker wires or the wire/connections for the Base Ring.
View attachment 17


7.) The camera unit is reassembled in reverse of disassembly. Use care when pressing the two PCBs together and ensure all three connector pins are aligned. The friction of the three connectors will hold the PCBs together during assembly.

8.) Note the location of the Base Ring wire on the outer part of the case as there is a small groove to allow the wire to fit easily without being pinched and don't forget to reinstall the ball and spring detent.


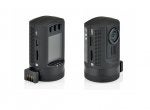
9.) When the Retaining Plate and End Cap (on-off switch) are installed, they should be aligned with the "key-hole' shape on the end of the case.


View attachment 4
MINI0806 DASH CAMERA OWNERS MANUAL -
View attachment Mini 0806 DashCam Owners Manual.pdf
WHAT TO DO WHEN LIPO BATTERIES SWELL -
Good read on how and why LIPO batteries swell and what you can, and can't, do about it.
View attachment What to Do When Your LiPo Batteries Swell.pdf
HOW LiPo BATTERIES ARE MADE -
For anyone who's interested, this link will take you to a website that will walk you through a typical Chinese LiPo production facility.
https://learn.sparkfun.com/tutorials/ho ... e-made/all

mini0806 repair battery replacement disassembly iTracker mini0806-S GPS Car Camera
As you can see here, the normally thin silver battery capsule has ballooned to at least three times its normal thickness. I can only imagine how much pressure this has been putting on the PCB and the housing.
For anyone who's not familiar with this dash cam, you can read my review here -
Open Box Review - Mini0806 Dashcam
https://www.ttforum.co.uk/forum/viewtop ... &p=6326033
After looking over the PCB, I found the date 2014-7-15, so I'm going to assume the battery was installed sometime after this date. Most product literature I've read concerning LiPo batteries suggests they're only good for two to three years, or 300-500 recharge cycles, whichever occurs first. Fortunately new replacement batteries are still available on Alibaba, Amazon and eBay. Since I have two of these cameras, I'll replace both batteries since odds are good the second camera battery is probably going to fail sooner than later.
If the LiPo battery is dead and the power is shut off the system won't be able to shut down properly which can lead to the SD card becoming corrupted. In the case of a Mini0806 a rather loud three-beep alarm will sound when the SD card is corrupted. You can hear what that sounds like here.
If you're experiencing random problems with your dash cam, it may be worth opening it up and inspecting the battery. While this post is specific to the Mini0806, the concept for replacement is the same for basically any dashcam that uses this sort of battery technology, and you can probably find a good YouTube for your specific camera.
I have also included the Mini-0806 owners manual (English) and an article on LIPO battery swelling as PDF downloads at the bottom of the post.
LIPO BATTERY PROTECTION PCM -
When you're looking for a replacement battery, be sure it has a PCM or Protection Circuit Module. This is not a "given" feature in all LiPo batteries so check carefully when your order and double check that it's present before installing the new battery. You can see it here under the Kapton tape of the battery that failed and in a replacement battery advertisement -
View attachment 1
COMPONENTS OF THE MINI0806 DASH CAMERA -
• The camera case is a two piece, snap fit design.
• The on/off button is enclosed in, and part of, the End Cap.
• A Retaining Plate is held in place with four small screws and serves three purposes;
- secures the two camera case halves together
- keeps the Base Ring in place
- secures the End Cap and on-off switch to the camera assembly
• Both halves of the case can only be separated once the retaining plate and base ring have been removed.
• There are five snaps on the camera-half, two on either side of the data ports and one on the end of the case.
• There are two snaps on the battery-half, both are on the end of the case, oppose the end cap
• Inside the camera are two PCBs which are connected together by three multi-pin connectors.
• One PCB contains the camera and screen, the other PCB contains the microprocessor and the battery.
• The camera speaker is mounted insde the back of the case, behind the battery PCB.
• The LiPo battery is positioned between both PCBs.
• There are two grommets on either side of the case;
- (A) MicroSD and Power port
- (B) MicroSD and MicroHDMI port.
DISASSEMBLY OF THE MINI0806 DASH CAMERA -
NOTE - This is for informational purposes only. If you follow these instructions, you do so at your own risk. Always wear safety glasses, handle the battery carefully and do not puncture the battery case as it may discharge Carbon Monoxide gas. Dispose of the battery properly. DO NOT REPLACE THE BATTERY WITH A HIGHER VOLTAGE OR AMPERAGE RATING!
1.) The Base Ring is rotated so the base contact foot is aligned with either the camera lens or the display screen.
2.) A narrow bladed tool is used to pry the snap release and remove the End Cap. There are two snap releases positioned 180° from each other. Only one needs to be completely released in order to remove the End Cap from the Retaining Plate. Note the small rubber bumper located on the back of the on/off button.
3.) The four screws are removed from the Retaining Plate after which the Retaining Plate can be removed.
4.) Now the Base Ring can be removed. Note the ball and spring detent which are positioned approximately 4mm to the right of the Recording Indicator LED. The Base Ring should be removed with caution so the ball and spring are not lost or damaged. The Base Ring wire is soldered to the PCB and is routed through the case, therefore it can not be removed from the camera assembly without de-soldering. Caution should be used while handing the entire camera assembly to avoid damage to the Base Ring wires.
5.) The two camera case halves are separated starting on one end and prying it open like a clam shell. Note the locations of the snaps (blue triangles) around the edges of the case halves. Once the two halves are separated the two Port Grommets can be removed.
View attachment 9
NOTE - If the battery is severely swollen, it will exert pressure against the case halves and both PCBs as the case is disassembled. Care should be used to prevent damage to the three sets of connecting pins that connect the two PCBs together.
6.) The battery is secured to the PCB with a small piece of double-sided adhesive foam tape. Once removed from the PCB, the user should verify the specifications marked on the battery to ensure the correct replacement battery is ordered; (e.g. CX402030, 200mAh, 3.7V). The positive and negative wires are cut noting the location of the positive and negative connections on the PCB. Once removed and the wires de-soldered, a replacement battery can now be soldered into place. Use 1mm thick double sided adhesive foam tape to secure the battery to the PCB in the correct orientation relative to the PCB.
NOTE - Use care when handling the cases as it is very easy to damage the speaker wires or the wire/connections for the Base Ring.
View attachment 17
7.) The camera unit is reassembled in reverse of disassembly. Use care when pressing the two PCBs together and ensure all three connector pins are aligned. The friction of the three connectors will hold the PCBs together during assembly.
8.) Note the location of the Base Ring wire on the outer part of the case as there is a small groove to allow the wire to fit easily without being pinched and don't forget to reinstall the ball and spring detent.
9.) When the Retaining Plate and End Cap (on-off switch) are installed, they should be aligned with the "key-hole' shape on the end of the case.
View attachment 4
MINI0806 DASH CAMERA OWNERS MANUAL -
View attachment Mini 0806 DashCam Owners Manual.pdf
WHAT TO DO WHEN LIPO BATTERIES SWELL -
Good read on how and why LIPO batteries swell and what you can, and can't, do about it.
View attachment What to Do When Your LiPo Batteries Swell.pdf
HOW LiPo BATTERIES ARE MADE -
For anyone who's interested, this link will take you to a website that will walk you through a typical Chinese LiPo production facility.
https://learn.sparkfun.com/tutorials/ho ... e-made/all
mini0806 repair battery replacement disassembly iTracker mini0806-S GPS Car Camera