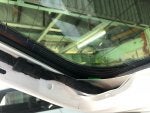
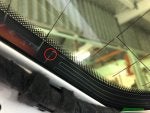
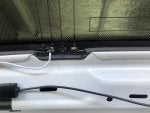
This modification works well and is well worth the effort in my opinion. DAB reception is good and it does away with the need for an ugly stick-on window aerial.
This modification should not be attempted unless you are competent/ confident at soldering.
The parts required are:-
Aerial amplifier module 8J8035225J
Connector housing 1C0973119B
2 x Repair wires 000979009E
Fixing screw N90775001
Fixing clip WHT000025
3.5m Aerial cable with universal Fakra connectors VAG 000098654A
Zip ties and/or cloth loom tape
The repair wires and aerial cable are across brand VAG part numbers and may be cheaper at a Skoda dealership!
Tools required are:-
Trim removal tools
T20 and T25 Torx drivers
Tweezers or needle nose pliers
Wire cutters and stripper
Suitable soldering iron
To fit the amp module both parts of the plastic trim must be removed from inside the rear hatch. The lower trim is removed first by removing the two screws from inside the handle recess (T20 Torx) and then pulling it away starting at the ends. Use a trim tool to get started. Popping the clips out requires a firm pull. The manual hatch lock release must be disconnected from the right side. Then remove the screws from the lower ends of the upper trim (T25 Torx) and the cable clip from each side near the screw. Again use a trim tool at the ends to get started and pull the clips out. Firm pulling is required and it is easier with two people as the trim is unwieldy and could be damaged. Any spring clips that remain in the hatch should be removed and re-inserted in the trim.
The amp module fits on the top left side of the hatch in the same way as the existing module on the right side. My module came complete with the fixing clip but as the clip only costs 0.67p it may be just as well to order one anyway.
The fixing screw expands the clip and holds the module in place. The screw needs to have a head diameter of 9.5mm to avoid fouling the Fakra connector. The screw supplied to me under the above part number which should have been the correct was one with a large head that was too big. The installed picture shows the correct screw.
Take the two repair wires and cut three of the terminals off with the same length of cable as there is on the right hand module. You will have one length of cable with a connector spare. Strip 3mm of insulation from the wire ends and tin them. Insert the three terminals into the housing and snap the housing closed. Note that the housing identifies the terminals as 1,2,& 3. Above the amp module you will see three solder pads on the screen. On mine a very short length of snipped off wire was soldered to each one. I carefully, with a very sharp craft knife removed the grey foam directly below the solder pads. You will notice that the three pads are identified by one, two and three dots. Carefully de-solder and remove the three snipped off wires from the pads and tin the pads. Plug the connector into the amp module and bend the wires so that the cable from terminal one goes to pad one etc. If in doubt look at the way the connections to the right hand module are made. Carefully solder the three wires to their respective pads. You will need to hold the cables in position with tweezers or needle nosed pliers. Apply the minimum amount of heat needed to make a good joint.
Plug the end of the aerial cable with the Fakra cable into the green connection on the module.
The aerial cable needs to be run behind the right hand A pillar trim (the factory takes all the aerial cables along the right side). Remove the "water blue" universal Fakra housing from one end of the cable to just leave the bare SMB connector. That makes it easier the thread through and is not needed for connection to Japanese designed head units which don't seem to use Fakra standards at all. Use a trim tool to prise up the front edge of the C pillar trim and pull out the first clip. That will allow you to start pulling the A pillar trim off. After the first few clips have been pulled out it will be possible to carefully pull the end of the trim out from behind the C pillar trim. When all the clips are removed the bit that covers the actual A pillar is removed by pulling upwards.
Remove the roof trim panel that is to the rear of headliner again by using a trim tool to start and then pulling the clips out. Pull the ends of the right hand rubber concertina grommet out of the body and the hatch (it easily pops out and back again). The bare SMB end of the aerial cable then has to follow the line of the existing aerial cables through the grommet into the body through a hole that the existing cables pass through so that it is visible above the headliner. Then carefully pull the cable through and tape it to the existing cables behind the A pillar trim as you go.
Remove the cover of the fuse panel at the end of the dash which will allow you to see the cable at the bottom of the A pillar.
Remove the trim above the pedals so that you can thread the cable above the steering column and up to behind the HU. Tape or zip-tie the cable up so it can't rub on the steering column.
When the cable has been run from the amp module to the head unit, replace all the trim panels and push the ends of the concertina grommet back into the hatch and body.


