Audi TT Forum banner

How to remove the softtop? Must replace hoses, water inside!

2 reading
26K views 52 replies 20 participants last post by  Hacksawcats  
#1 ·
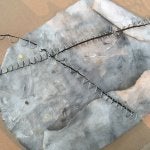
We want to replace the waterhoses to solve the wetness in the boot. We have already done the spoiler with new rubbers and new kit.

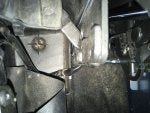
This hose still works:
Image


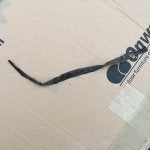
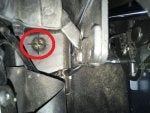
The one on the other side is causing al the problems:
Image


Ofcourse we're going to replace them both. I've asked the Audi-dealer to do this for me, but they haven't got any time.

The way to do it, is to remove the softtop. So my question is, has anyone ever removed their softtop?
 
#27 ·
phil5556 said:
I just paid ÂŁ55 Inc vat from TPS this afternoon for a pair.
The guy that took the order wasn't sure if they came with the gromets on the end, but they do come as a complete unit.

Sent from AutoGuide.com Free App
Cheers have you got the part number should be on the bags they came in and on the parts them self
 
#29 ·
#30 ·
Phil ,

I have replaced one of mine but need to do the other sometime . Would you mind if I ask how you managed to get the tube fixed onto the tray outlet . I know when I did one of mine it was a real struggle but managed it by attaching some thing to the tube and pushing the tube up through one of the panel holes .

I can only think that you probably had a large knot at the grommet end and pulled upwards from the tray top .

Thanks.............John
 
#31 ·
this post was really really helpful and put me in good stead to investigate mine which err I have been delaying for several years. What I found was somewhat odd. Mine is a 2000 roadster and I have owned it since I think 2003, yet I don't have those condom style drain tubes! Mine are solid rigid tubing, a bit like conduit or water pipe! The spring just removes from the bottom and out with it comes all the crud. There does appear to have at some stage been some product wrapped round the spring but the lack of it doesn't affect the drain and it isn't leaking into the car.

It was a very pleasant surprise.

One thing that I did find out though is that there is a "skirt" that makes the channel for when the roof is up. If you have the roof half way up/down you can see the plastic cover and under this sit the skirt. Mine had completely come loose so any drips from the rear edges of the roof past the body were leaking directly behind the parcel shelf carpet. I think that plastic part is a roof off job so for the time being I have managed to gaffa tape it up ok and it isn't leaking so far.
 
#33 ·
I have a 2002 Quattro Roadster. I had water leaking into the cabin so badly that I had to replace the carpet. After tearing everything out, I performed a water test on the convertible top and found water running into the trays on both sides (as pictured in posts below). I then stopped what I was doing and did a search online - coming across this series of posts which proved to be immensely helpful.

We took a plastic coated, flexible clothesline and ran in down the drainage tube. At the bottom, we unscrewed two screws on the panel in the wheel well, rather than taking the tire off. Using a screwdriver, we popped the panel open enough to be able to work from the bottom of the drainage tube. As the wire came down the tube, it began to push a white spiral wire out of the canal. There was a small amount of a rubber substance attached to the wire, which had obviously wrapped around the wire but had completely corroded. We pulled all of the wire out, all of the junk from the rubber substance and other dirt in the form of decayed leaves from the drainage canal (see photos of wire and rubber).

We again tested the clearance of the canal by directly running a small stream of water from a hose into the drainage trays. On both sides, the water gushed out of the canal holes at the bottom and no water drained into the car. We installed the carpet and it all looks beautiful. MY QUESTION IS: By taking out the wire, did we do ourselves in later on??? Will the material inside the canal that is left collapse? It felt like a plastic liner, but I am not sure.
 

Attachments

#35 ·
TTQ NC said:
We again tested the clearance of the canal by directly running a small stream of water from a hose into the drainage trays. On both sides, the water gushed out of the canal holes at the bottom and no water drained into the car. We installed the carpet and it all looks beautiful. MY QUESTION IS: By taking out the wire, did we do ourselves in later on??? Will the material inside the canal that is left collapse? It felt like a plastic liner, but I am not sure.
I believe, but am not sure, that the strip of rubber attached to the spring is a strip of adhesive tape that is supposed to stop it moving along the tube. Mine had something similar. If I recall correctly, I shoved the spring back up in the tube.
 
#39 ·
#40 ·
Hacksawcats said:
Hacksawcats said:
silverbug said:
In a word , Photobucket :twisted: .
Did you click on the link above though ?
It still has photos that work and describes it well....

https://www.ttforum.co.uk/forum/viewtop ... 2&t=562177
Ahh, Great, Many thanks :)
Good stuff! I've read it now. Good job you told me before I put it all back together! Many thanks :)
No worries .
It does look as if the best way to check if the drain tubes are naffed on a roadster is to remove the rear wheel arch liner and remove / look through the grommet that's half-way up.
It's one of the few jobs on my car left to do, not that I have any leaks, but want to check for peace of mind .
 
#42 ·
1 each either side of car , difficult to see easily but easier if roof up.
Stand by rear 1/4 of car and peek through hood window , look at area immediately rearwards of each door jamb and its a small square black plastic tray with a drain hole in it .
The excess water that flows along the hood 'skirt' drains into these trays at each side (which has a drain tube attached) and then water is funnelled underneath and out the rear wheel arch (as long as the drain tubes are intact that is ).
The drain tray has as sort of X shaped grid to stop leaves & twigs etc blocking it , I vacuumed mine out but it's quite a difficult task as with hood up you can't see what you're doing and can't get head in there as access is tight .
Eventually I succeeded with a telescopic mirror tool and a flexible cleaner attachment , still tricky though .
I'll see if I have any pics , I doubt it though as those trays are tricky to even see, let alone photograph .

Edit ,
I don't have any pics but this thread
https://www.ttforum.co.uk/forum/viewtop ... 5&start=15

Look at the post by shell of 23 Nov 2009 and despite the blurred photos courtesy of Phtobucket :twisted: , you can just make out the square drip/drain tray in one of the pictures .
I'd say with hood down they're virtually impossible to see as the folds of the hood fabric obscures the tray.
 
#43 ·
silverbug said:
1 each either side of car , difficult to see easily but easier if roof up.
Stand by rear 1/4 of car and peek through hood window , look at area immediately rearwards of each door jamb and its a small square black plastic tray with a drain hole in it .
The excess water that flows along the hood 'skirt' drains into these trays at each side (which has a drain tube attached) and then water is funnelled underneath and out the rear wheel arch (as long as the drain tubes are intact that is ).
The drain tray has as sort of X shaped grid to stop leaves & twigs etc blocking it , I vacuumed mine out but it's quite a difficult task as with hood up you can't see what you're doing and can't get head in there as access is tight .
Eventually I succeeded with a telescopic mirror tool and a flexible cleaner attachment , still tricky though .
I'll see if I have any pics , I doubt it though as those trays are tricky to even see, let alone photograph .
That's great,many thanks and thanks for the quick reply!
 
#44 ·
Hacksawcats said:
silverbug said:
1 each either side of car , difficult to see easily but easier if roof up.
Stand by rear 1/4 of car and peek through hood window , look at area immediately rearwards of each door jamb and its a small square black plastic tray with a drain hole in it .
The excess water that flows along the hood 'skirt' drains into these trays at each side (which has a drain tube attached) and then water is funnelled underneath and out the rear wheel arch (as long as the drain tubes are intact that is ).
The drain tray has as sort of X shaped grid to stop leaves & twigs etc blocking it , I vacuumed mine out but it's quite a difficult task as with hood up you can't see what you're doing and can't get head in there as access is tight .
Eventually I succeeded with a telescopic mirror tool and a flexible cleaner attachment , still tricky though .
I'll see if I have any pics , I doubt it though as those trays are tricky to even see, let alone photograph .
That's great,many thanks and thanks for the quick reply!
No worries , I did find a thread with pics , have edited my original post .
Just took a pic, not easy as it has to be done blind , stick phone over area, take pic and hope for the best :lol: .
Looks like I'll have to get the vacuum out again :?
 

Attachments

#45 · (Edited by Moderator)
silverbug said:
Hacksawcats said:
silverbug said:
1 each either side of car , difficult to see easily but easier if roof up.
Stand by rear 1/4 of car and peek through hood window , look at area immediately rearwards of each door jamb and its a small square black plastic tray with a drain hole in it .
The excess water that flows along the hood 'skirt' drains into these trays at each side (which has a drain tube attached) and then water is funnelled underneath and out the rear wheel arch (as long as the drain tubes are intact that is ).
The drain tray has as sort of X shaped grid to stop leaves & twigs etc blocking it , I vacuumed mine out but it's quite a difficult task as with hood up you can't see what you're doing and can't get head in there as access is tight .
Eventually I succeeded with a telescopic mirror tool and a flexible cleaner attachment , still tricky though .
I'll see if I have any pics , I doubt it though as those trays are tricky to even see, let alone photograph .
That's great,many thanks and thanks for the quick reply!
No worries , I did find a thread with pics , have edited my original post .
Just took a pic, not easy as it has to be done blind , stick phone over area, take pic and hope for the best :lol: .
Looks like I'll have to get the vacuum out again :?
Many thanks for taking the trouble. Just to be clear its the thing in the red circle that I'm looking for?
drip tray.jpeg
 

Attachments

#46 ·
Yes the drip/drain tray is the square black plastic thing in the picture, you can make out the outer square edge when you look carefully , you've circled in red the drain hole in the centre of the drip tray :p .
The roadster drain tubes are attached to that drip tray , and should of course direct water out and underneath the car , it's when those tubes are perforated/rotted/ naffed (a faulty rear window seal can cause it too) that water instead pours into the area occupied by the CCM etc and then the fun begins :cry: .
 
#47 ·
silverbug said:
Yes the drip/drain tray is the square black plastic thing in the picture, you can make out the outer square edge when you look carefully , you've circled in red the drain hole in the centre of the drip tray :p .
The roadster drain tubes are attached to that drip tray , and should of course direct water out and underneath the car , it's when those tubes are perforated/rotted/ naffed (a faulty rear window seal can cause it too) that water instead pours into the area occupied by the CCM etc and then the fun begins :cry: .
Great, thanks for confirming, let the fun begin then!
 
#48 ·
silverbug said:
Yes the drip/drain tray is the square black plastic thing in the picture, you can make out the outer square edge when you look carefully , you've circled in red the drain hole in the centre of the drip tray :p .
The roadster drain tubes are attached to that drip tray , and should of course direct water out and underneath the car , it's when those tubes are perforated/rotted/ naffed (a faulty rear window seal can cause it too) that water instead pours into the area occupied by the CCM etc and then the fun begins :cry: .
OK, I managed to find them and test them, the passenger side was blocked! That explains the reason for the water in the CCM area. and I managed to clear the blockage with some flexible thick wire. However when the water drained out of the drip trays, the water came out near the front wheel arches! Is this correct, or is it a sign of something else is wrong? Mines 2006 Roadster, so just wondering if the drainage design has changed from the earlier models.

Cheers
 
#49 ·
All the threads I've read describe the drain tubes as draining into the rear wheel arch , I can't see why they'd change it to the front? :?
Without being alarmist , I hope poking thick wire down them hasn't punctured one :eek: .
They are known as being fragile.
I still think that if you haven't yet done so it's worth removing the rear wheel arch liners and looking through the grommeted hole half way up to check on the condition of the tubes .
I'm waiting for a dry day to do this myself.
 
#50 ·
silverbug said:
All the threads I've read describe the drain tubes as draining into the rear wheel arch , I can't see why they'd change it to the front? :?
Without being alarmist , I hope poking thick wire down them hasn't punctured one :eek: .
They are known as being fragile.
I still think that if you haven't yet done so it's worth removing the rear wheel arch liners and looking through the grommeted hole half way up to check on the condition of the tubes .
I'm waiting for a dry day to do this myself.
Hmm, ok thanks, I'll take a proper look as soon as I get a dry day and let you know the outcome.