With my TTS being just over 4 years old, I was surprised to see my passenger heated seat button fall out when I set off from a junction recently.
I've heard the switches cost in the region of £70, however the chances are if I bought a new one it too may well only last 4 years.
I had a close look at what happened and have managed to repair it for a negligible cost and it'll most likely last longer than a new replacement.
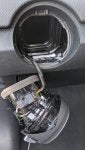
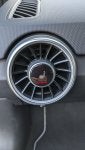
This is what my vent looked like after the heated seat button fell out.

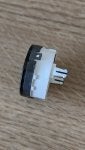
On very close inspection of the button I found two of the four small lugs broken off and one about to. One of the tiny lugs was found on the seat but the other was still inside the switch.
To retrieve the piece from the switch I opted to remove the vent, which is held in by clips. Using just my fingers i gently pulled the vent out of the dashboard towards the side window. once out there was just one electrical connector to unplug.

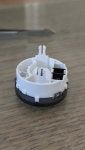
With the vent removed I was able to shake free the small lug, giving me the button and the parts that had broken from it.

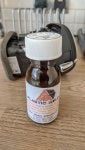
I'm a big fan of Plasticweld and this turned out to be an ideal application for it.

I applied a tiny quantity of Plasticweld to the cracked, but still attached, lug then pushed it back into position until set.

Then, after offering up each lug to find where it came from, reattached both the broken off ones with Plasticweld with the help of some tweezers.

With everything stuck back together I felt that if the button was refitted it would most likely break again in the near future.

To reinforce the lugs I used the insulation stripped from some burglar alarm cable, which was just the right diameter but not too firm, which would allow the lugs to move.
To hold the insulation in place I used Superglue, but wiped away the excess so things didn't become too rigid.

With insulation glued in place on both sides I trimmed the excess.

The button was then firmly pressed into position and the vent pushed back into the dashboard after reconnecting the cable.

I'm please to be able to report the switch now works as well as it did before the failure.

I've heard the switches cost in the region of £70, however the chances are if I bought a new one it too may well only last 4 years.
I had a close look at what happened and have managed to repair it for a negligible cost and it'll most likely last longer than a new replacement.
This is what my vent looked like after the heated seat button fell out.
On very close inspection of the button I found two of the four small lugs broken off and one about to. One of the tiny lugs was found on the seat but the other was still inside the switch.
To retrieve the piece from the switch I opted to remove the vent, which is held in by clips. Using just my fingers i gently pulled the vent out of the dashboard towards the side window. once out there was just one electrical connector to unplug.
With the vent removed I was able to shake free the small lug, giving me the button and the parts that had broken from it.
I'm a big fan of Plasticweld and this turned out to be an ideal application for it.
I applied a tiny quantity of Plasticweld to the cracked, but still attached, lug then pushed it back into position until set.
Then, after offering up each lug to find where it came from, reattached both the broken off ones with Plasticweld with the help of some tweezers.
With everything stuck back together I felt that if the button was refitted it would most likely break again in the near future.
To reinforce the lugs I used the insulation stripped from some burglar alarm cable, which was just the right diameter but not too firm, which would allow the lugs to move.
To hold the insulation in place I used Superglue, but wiped away the excess so things didn't become too rigid.
With insulation glued in place on both sides I trimmed the excess.
The button was then firmly pressed into position and the vent pushed back into the dashboard after reconnecting the cable.
I'm please to be able to report the switch now works as well as it did before the failure.