

As I could not find a good, clear tutorial on changing Audi calipers, etc...I decided to take a lot of pictures while doing this job to see if it can help others trying to do the same or similar thing.
Many thanks to all forum members that helped me in my other threads asking about bleeding sequence, etc... Your info was, as usual, invaluable.
Before I start, I am not a mechanic and this was my 1st time doing calipers so please let me know if you spot things I've done wrong, that I could have done differently (better, easier, etc...) or that I've missed so we can add it.
This is a work in progress as I am writing off the top of my head. I'll include torque specs, hex bit sizes, etc... later on.
Things I bought beforehand:
-- Obviously discs and pads!")
I bought Pagid Discs and Pads (Note that the discs are coated with an anti rust paint both in the friction and non friction areas. Not to worry as after a few moments driving you'll get to the bare metal on the discs and it won't interfere with the pads' performance.
![Image]()
--Rear calipers (Initially one but after being unable to compress the piston on the other caliper I had to buy another one...
They are Audi branded, exactly the same as the ones I had fitted but in the box it says Pagid (I am not sure, they might just re-manufacture them using their own products for the pistons, seals, etc...)
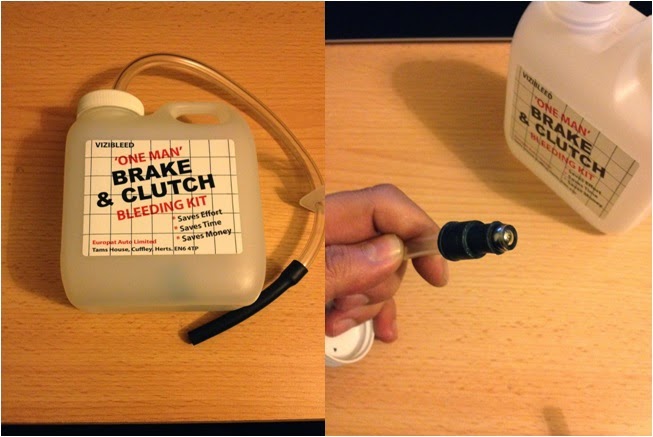
I also bought 2 litres of brake fluid ESP DOT 4 for cars with ESP (apparently it has lower viscosity) and a bleeding kit
![Image]()
The bleeding kit is quite cool as it has a one way valve that prevents air from going back up the tube into the caliper (that way you can do it by yourself without helper!)
![Image]()
Then I painted the calipers red using Halfords red caliper paint
![Image]()
Step by step
1) Remove rear wheels and put car on jack stands.
2)There's a Phillips retaining bolt holding the disc in place (it needs to be removed but most likely it will be very rusted and you'll only damage the thread if you try to undo it)
Get an impact driver, place as perpendicular to the disc as you can and hit it with a hammer (it was so easy with this tool!)
![Image]()
3)Undo the hand brake cable from the caliper mechanism. First remove the retaining spring (you can see it in the picture, hanging) Then you'll need to pull the lever (number 2) down and with a screw driver move the ball end of the cable (number 3) until you can detach it.
You can do it either with a ratchet by turning the bolt in the mechanism (number 1) or using pliers. You will see that the lever will rotate down giving you room to detach the ball end of the hand brake cable.
![Image]()
Once you have detached the cable you can then proceed to remove with a flat head screwdriver the clip that holds the cable in place and then pass the whole thing (cable and rubber boot) through the hole)
![Image]()
4)Loosen the bolt that goes at the top of the caliper (where the brake line goes) to have it ready for the removal of the caliper.
Then undo the 2 bolts for the caliper slider pins (you'll need: 11mm bit for the ratchet and a 15 spanner)
![Image]()
5) You can then remove the caliper (be careful and don't let it hang as it can damage the brake lines, I put whatever I had at hand underneath (a tin of paint, etc...)
-- Note how rusty everything was!!
![Image]()
6)Remove the 2 hex bolts that hold the caliper carrier in place and remove it so you can remove the disc.
![Image]()
7) Remove the disc and fit the new one. Note: I replaced the disc retaining bolt for these others I bought online made of stainless steel and with a hex head (I also put some copper grease on the thread)
![Image]()
8 ) Clean and regrease the caliper slider pins using silicone grease
![Image]()
9) Refit the caliper carrier, peel off the cover for the adhesive in the pads and slide them in place.
10) Go to the brake fluid reservoir and remove the cap.
Then finish undoing the bolt on top of the square box where the brake line goes and you'll be able to completely remove the caliper. Have the new one at hand and quickly refit the brake line, trying to lose as little fluid as you can (minimising the amount of air that gets in)
Note: the new calipers come with 2 copper washers that should be replaced (one goes at the top of the bolt and the other goes at the bottom of the square bit the bolt attaches itself to.
![Image]()
Note: it was a step that I had to do quickly so could not take any photos!
While doing this, keep an eye on the brake fluid reservoir and try not to let it get empty!! (I almost got it empty when replacing the second one as I lost a bit too much fluid)
11) Bleed the wheels at the calipers. Undo about half a turn the bleed nipple and fit in place the bleeding kit (make sure it's tight!)
Go to the car and press the brake pedal a few times (you'll see some air coming out). Keep doing this until the fluid comes clear with no bubbles (keep an eye on the reservoir and top up when needed)
The sequence I followed was: Near side rear / Offside rear / Near side front / Offside front
(Hoggy and the Bentley manual suggested a completely different sequence, starting from the front)
Press a few times the pedal (don't go all the way down) and keep an eye on the tube and reservoir until the fluid comes without bubbles (you'll have to get in and out of the car all the time!)
Note: there was one bleed nipple that was all rusted and wouldn't turn. I used this product "Shock and Unlock" from Halfords. I sprayed a lot of it for a few seconds and then I tapped the nipple with a hammer. It worked great!!
![Image]()
12) Refit the handbrake mechanism (using the same procedure as before) Remove the return spring first. Then rotate lever using centre bolt to make room for the ball end of the cable. (See last set of pictures at the end)
Make sure that once you refit the cable, the gap between the "stop"lever and the lever itself is less than 1mm. We attach the cable only at the end as if you try to move the lever mechanism without fluid/pressure in the caliper you would need to reset the mechanism!)
12) Test the car. Turn the ignition on and start the engine. See how the brake pedal goes. Mine was quite spongy and soft, with quite a lot of travel. If this is the case, you'll have to bleed the master cylinder!
Underneath the reservoir there are 2 bleed nipples.
![Image]()
They are the ones you need to do but as you can see they're a bit tricky to get to. I used a combination of ratchet extensions and universal joints with a 7mm socket to losen it up (about 1/2 a turn)
![Image]()
Bleed in any order the same way as the calipers, until fluid comes clear. (I did the closest/easiest first though)
Bleeding the master cylinder did the trick and the car's pedal feel was now as it should. I took the car to my local Audi Indy for peace of mind and he said that it was normal after new fluid, pads, etc.. for the brake to feel a bit softer than before
Here are 3 pics: one of the fitting of the hand brake cable and 2 of the finished product:
![Image]()
Hope it helps someone but please remember, you're working with the brake system so be careful and do this at your own risk!
Many thanks to all forum members that helped me in my other threads asking about bleeding sequence, etc... Your info was, as usual, invaluable.
Before I start, I am not a mechanic and this was my 1st time doing calipers so please let me know if you spot things I've done wrong, that I could have done differently (better, easier, etc...) or that I've missed so we can add it.
This is a work in progress as I am writing off the top of my head. I'll include torque specs, hex bit sizes, etc... later on.
Things I bought beforehand:
-- Obviously discs and pads!
I bought Pagid Discs and Pads (Note that the discs are coated with an anti rust paint both in the friction and non friction areas. Not to worry as after a few moments driving you'll get to the bare metal on the discs and it won't interfere with the pads' performance.

--Rear calipers (Initially one but after being unable to compress the piston on the other caliper I had to buy another one...
They are Audi branded, exactly the same as the ones I had fitted but in the box it says Pagid (I am not sure, they might just re-manufacture them using their own products for the pistons, seals, etc...)
I also bought 2 litres of brake fluid ESP DOT 4 for cars with ESP (apparently it has lower viscosity) and a bleeding kit

The bleeding kit is quite cool as it has a one way valve that prevents air from going back up the tube into the caliper (that way you can do it by yourself without helper!)
Then I painted the calipers red using Halfords red caliper paint

Step by step
1) Remove rear wheels and put car on jack stands.
2)There's a Phillips retaining bolt holding the disc in place (it needs to be removed but most likely it will be very rusted and you'll only damage the thread if you try to undo it)
Get an impact driver, place as perpendicular to the disc as you can and hit it with a hammer (it was so easy with this tool!)

3)Undo the hand brake cable from the caliper mechanism. First remove the retaining spring (you can see it in the picture, hanging) Then you'll need to pull the lever (number 2) down and with a screw driver move the ball end of the cable (number 3) until you can detach it.
You can do it either with a ratchet by turning the bolt in the mechanism (number 1) or using pliers. You will see that the lever will rotate down giving you room to detach the ball end of the hand brake cable.

Once you have detached the cable you can then proceed to remove with a flat head screwdriver the clip that holds the cable in place and then pass the whole thing (cable and rubber boot) through the hole)

4)Loosen the bolt that goes at the top of the caliper (where the brake line goes) to have it ready for the removal of the caliper.
Then undo the 2 bolts for the caliper slider pins (you'll need: 11mm bit for the ratchet and a 15 spanner)

5) You can then remove the caliper (be careful and don't let it hang as it can damage the brake lines, I put whatever I had at hand underneath (a tin of paint, etc...)
-- Note how rusty everything was!!

6)Remove the 2 hex bolts that hold the caliper carrier in place and remove it so you can remove the disc.

7) Remove the disc and fit the new one. Note: I replaced the disc retaining bolt for these others I bought online made of stainless steel and with a hex head (I also put some copper grease on the thread)

8 ) Clean and regrease the caliper slider pins using silicone grease

9) Refit the caliper carrier, peel off the cover for the adhesive in the pads and slide them in place.
10) Go to the brake fluid reservoir and remove the cap.
Then finish undoing the bolt on top of the square box where the brake line goes and you'll be able to completely remove the caliper. Have the new one at hand and quickly refit the brake line, trying to lose as little fluid as you can (minimising the amount of air that gets in)
Note: the new calipers come with 2 copper washers that should be replaced (one goes at the top of the bolt and the other goes at the bottom of the square bit the bolt attaches itself to.

Note: it was a step that I had to do quickly so could not take any photos!
While doing this, keep an eye on the brake fluid reservoir and try not to let it get empty!! (I almost got it empty when replacing the second one as I lost a bit too much fluid)
11) Bleed the wheels at the calipers. Undo about half a turn the bleed nipple and fit in place the bleeding kit (make sure it's tight!)
Go to the car and press the brake pedal a few times (you'll see some air coming out). Keep doing this until the fluid comes clear with no bubbles (keep an eye on the reservoir and top up when needed)
The sequence I followed was: Near side rear / Offside rear / Near side front / Offside front
(Hoggy and the Bentley manual suggested a completely different sequence, starting from the front)
Press a few times the pedal (don't go all the way down) and keep an eye on the tube and reservoir until the fluid comes without bubbles (you'll have to get in and out of the car all the time!)
Note: there was one bleed nipple that was all rusted and wouldn't turn. I used this product "Shock and Unlock" from Halfords. I sprayed a lot of it for a few seconds and then I tapped the nipple with a hammer. It worked great!!

12) Refit the handbrake mechanism (using the same procedure as before) Remove the return spring first. Then rotate lever using centre bolt to make room for the ball end of the cable. (See last set of pictures at the end)
Make sure that once you refit the cable, the gap between the "stop"lever and the lever itself is less than 1mm. We attach the cable only at the end as if you try to move the lever mechanism without fluid/pressure in the caliper you would need to reset the mechanism!)
12) Test the car. Turn the ignition on and start the engine. See how the brake pedal goes. Mine was quite spongy and soft, with quite a lot of travel. If this is the case, you'll have to bleed the master cylinder!
Underneath the reservoir there are 2 bleed nipples.

They are the ones you need to do but as you can see they're a bit tricky to get to. I used a combination of ratchet extensions and universal joints with a 7mm socket to losen it up (about 1/2 a turn)

Bleed in any order the same way as the calipers, until fluid comes clear. (I did the closest/easiest first though)
Bleeding the master cylinder did the trick and the car's pedal feel was now as it should. I took the car to my local Audi Indy for peace of mind and he said that it was normal after new fluid, pads, etc.. for the brake to feel a bit softer than before
Here are 3 pics: one of the fitting of the hand brake cable and 2 of the finished product:

Hope it helps someone but please remember, you're working with the brake system so be careful and do this at your own risk!


