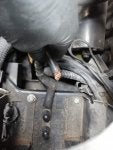
Audi TT Forum banner

Alternator problem - low voltage - from 11.5V to 14.4V

16K views 38 replies 11 participants last post by  mabo  
#1 · (Edited by Moderator)
Alternator prob:

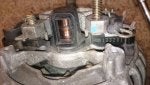
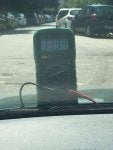
The 120A Bosch alternator is charging but not enough. With engine on its 13.4-13.6V with no consumers on and will drop to 11.5-12.4V when I turn on consumers (radio, lights, aircon). In my 2100km summer trip the red battery light on the dash flashed a couple of times when driving on the motorway :? New 60A Bosch battery replaced February.

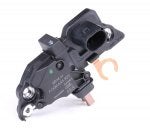
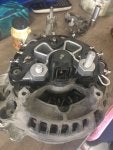
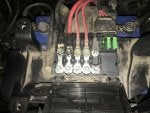
About a year ago I have replaced the regulator with Bosch blue part. The old part was knackered and the brushes were almost eaten up. Did they put in a 90A regulator although I think the part is the same for 90 and 120A

Bosch regulator
bosch regulator.jpg


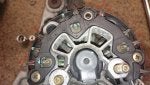
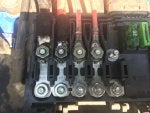
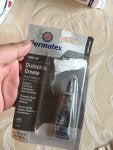
I read that apart from the regulator, theres also a different rectifier part by Bosch which also gets messed up, a diode burns and makes the alternator output less.
It's probably one of the rectifier pack diodes within the voltage regulators that has failed. This causes a half-wave on one of the three phases reducing overall power output and putting increased strain on the remaining five diodes. I've witnessed this many times on large three phase marine generators.
Bosch rectifier part
bosch rectifier.jpg


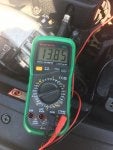
How to test and check before throwing (again) parts to a problem?

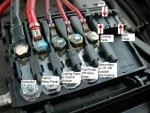
Aircon code 20 shows exactly the same voltage when testing with multimeter

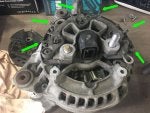
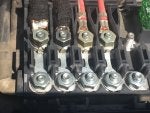
EDIT: OK I understand the rectifier is the part below the regulator - can this be replaced with the alternator on the car?


Attachments

#2 ·
If you have already changed the voltage regulator once there is a possibility that slip rings are worn but more than likely from the fault description one or more diodes has failed on the rectifier.
This requires soldering to be fitted and can't be done on the car really.
The alternator effectively produces 3 phase AC that is rectified by the diode bridge and if you lose a diode you lose roughly 33% of the capacity but also gain a load of AC ripple as the voltage output will not be smooth.

 
#3 ·
My conclusion exactly. This also explains why my batteries keep dying as I have been buying new battery every year and a half. Probably it has been like so for a while.

Tested today and although the rectifier doesnt produce AC, diode reading on the alternator is low about 370. It should be 500 to 800.

Good two part series videos on alternator testing:


The problem is that there are two bosch parts, specs aren't definitive which is needed for 120A, so need to get the alternator out first and see whats installed:

Bosch rectifier parts:
Bosch order number: F 00M 123 244
Bosch order number: F 00M 133 246
 
#4 · (Edited by Moderator)
You don't necessarily need a 120A alternator. I ran a 70A alternator on my TT and currently have a 90A one on the car that would probably run fine on a TT if you do not use all the load consumers at the same time. The Alternator output is specified to keep up with the required output if you have engine, headlights, heated rear screen, wipers, heated seats, fan,stereo etc all going at the same time. If you weren't using them all at the same time you could run a smaller alternator.
It may be cheaper and easier looking for a second hand alternator.
I had a look at my old 120A alternator 2002 vintage part number 028903028E and dropped the voltage regulator and rear cover off. The part number of the diode pack is F00M133201 which appears to be replaced by F000133246 .
https://www.autodoc.co.uk/bosch/761677

DSC_5205.JPG


DSC_5207.JPG


If you replace the Diode pack you will need to disconnect these joints and remake them on the new pack . They look to either be mechanically crimped or fused somehow. Probably the trickiest part of replacing the bridge. Do you have a decent high power soldering iron?.

DSC_5208.JPG
 

Attachments

#5 ·
Awesome. Thanks for the heads up. [smiley=thumbsup.gif]

Cant find the youtube video, but apparently you attack the old connections from the side, taking off chunks of the solder/plastic glue that secures the cables and with some wiggling the wires should come off. Then you crimp the cables to the new part with its own "hooks" and solder as standard... the alternator isn't a throwaway item and can be rebuilt indefinitely, replacement bearings exist, pulley as well as the copper "axle" on the other side where the brushes go in case this is also eaten up...

This problem has cost me at least 4 new batteries at 70-100euros each... Last 63Ah Varta battery lasted 14 months, just out of warranty, fitted a cheaper 60Ah this time.

I believe I need a powerful alternator since I have the DRLs, an aftermarket radio and amp fitted, as well as a tracker.

Again, thanks for taking the time to lookup your alternator for me. :D
 
#8 · (Edited by Moderator)
Partial success... You decide.

First went to get a spare rectifier yesterday with the Bosch part # (shop tells yes I have that over the phone and when I got there he had a non-Bosch part :x , anyways most of these parts look the same) and then to garage to take out the alternator. It wasn't an easy job and I doubt I could have managed taking it out of the car on my own...

With the alternator on the bench replacing the rectifier is easy, take out cover, remove the regulator (the part with the brushes) and then with a soldering iron and some force break apart the 6 wires of the rectifier and out it comes. Scrub the wires with sandpaper to reveal the copper, slide the new rectifier in, tighten the loops around wires and then you add some solder, pretty straightforward. As desertstorm said, you need a decent soldering iron, we had a 10eur one :roll:
IMG_9614(1).JPG


Old rectifier out and wires scrubbed with sandpaper
IMG_9616(1).JPG


New one in
IMG_9617(1).JPG


However, testing the old 18year old rectifier with a multimeter (diode setting) showed that none of the 6 diodes were shot (the diodes are the round parts that look like keyfob )batteries. Actually they all had exactly the same measurement .423 to .425 [smiley=bigcry.gif]

I keep doing the same mistake of first buying parts and then diagnosing the problem...

The pulley on the alternator was stuck locked, didn't know that this thing should turn freely one way and lock the other, much like a bicycle. New one was 30eur.

Old
IMG_9618(1).JPG


New
IMG_9619(1).JPG


Result was nowhere near ideal (14.40-14.50V) when the alternator was put back in the car. We got about 14.00V max on the alternator with engine rpm at 3000. With no electricals on, measuring on the battery it stays about 13.6V and worst was 12.90V with everything on (all lights, radio aircon, heated rear window, heated seats etc). Still about 1V better than before. Voltage drop from alternator to battery was about 0.4 to 0.5V which maybe warrants getting a new cable (I think Wak had a link for a strong one and suggested replacing the OEM)... Don't know if we should have taken apart the alternator and sandpaper some metals but too late now...
IMG_9622.JPG


I will monitor it with the tracker (it has an email alert if battery voltage drops below 12.4V any time) and post an update... Was getting emails as low as 11.3Volts.
 

Attachments

#9 ·
The battery will limit the voltage, regardless of the alternator output, so, you may find that as the battery charges up, the voltage measurement, across the battery, increases. The battery will have had a hard time till now. Finger crossed ... Mac.
 
#11 · (Edited by Moderator)
Here are today's pics of the box above the battery.

IMG_9636.JPG

IMG_9638(1).JPG


Testing with all electrics on (as above), the black cable would get extremely hot to the touch but I think it's fine for normal operation. Some corrosion exist on the second red interior cable.

I could get new cable links (and crimp and solder them), however it appears that these cables are extremely short so theres no space to cut the old rings and solder new ones for better performance.

I have read that cleaning and maybe soldering the rings can up the voltage a bit...
 

Attachments

#12 · (Edited by Moderator)
Silkman - check the condition of this cable - mine snapped from engine movement and is the main earth from starter to chassis (without the cable Shed's starter motor wouldn't engage at all):

IMG_20190602_152120.jpg


I had to do a ghetto repair which <touch wood> seems to have worked so far (but hasn't fixed my low voltage problem which happens with the aircon on):

IMG_20190602_175359.jpg


/Al
 

Attachments

#13 ·
Hi, If the alternator/generator link is getting hot, that means a poor connection & high resistance.
I'd remove that one at least & clean up the connections until they are shiney clean.
Also soak the crimp/cable in switch cleaner & recrimp tighter.
Hoggy. :D
 
#15 · (Edited by Moderator)
Update #2
Took the TT to an electricial who said its very common for wires to not make good contact. For 15eur he cleaned and put solder on the first two wires (though not on the two smaller wires on the right - lazy bastard :roll: ). There was definitely some more improvement, I was able to momentarily see 14.00V on the code 20 aircon.

Not pretty but it works.
IMG_9700(1).JPG

IMG_9702(1).JPG


Now runs at about 13.80V with aircon on and 13.95V with no electrics on.
IMG_9705(1).JPG

IMG_9707(1).JPG


Will also check the ground when my battery side and rear covers arrive from Audi.
 

Attachments

#16 ·
Might be me, but I'm not impressed with his soldering. It doesn't look like he did a good clean before soldering. Should have bright metal first, then apply flux, then heat, finally solder. All done with the wires disconnected. Mac.
 
#17 ·
PlasticMac said:
Might be me, but I'm not impressed with his soldering. It doesn't look like he did a good clean before soldering. Should have bright metal first, then apply flux, then heat, finally solder. All done with the wires disconnected. Mac.
Neither am I impressed. The problem is, for large wires as these you need specific crimpers which are expensive and are seldom used so not even professionals buy them, let alone me spending 100eur on a 16mm wire crimper that will be used once.

Terminals for large gauge are 1-5eur each but its not the terminals, its the crimpers.
 
#18 ·
silkman said:
Now runs at about 13.80V with aircon on and 13.95V with no electrics on.
I can't remember the exact reading, but I measured my voltage just for grins not long after purchase, and my recollection was I was just barely 14V, like 13.9X. I clenched, but pushed on holding my breath waiting for failure. That was Jan/Feb. Actually forgot about it until this thread. If I hadn't measured, never would have known. Wonder if this might be "normal" for an aging V6....
 
#19 ·
desertstorm said:
You don't necessarily need a 120A alternator. I ran a 70A alternator on my TT and currently have a 90A one on the car that would probably run fine on a TT if you do not use all the load consumers at the same time. The Alternator output is specified to keep up with the required output if you have engine, headlights, heated rear screen, wipers, heated seats, fan,stereo etc all going at the same time.
Just to highlight the above with all main loads on its 95-100a draw


Always measure output at the alternator and battery. Very common for the connecting cable to be a problem area.
 
#20 ·
[/quote]

I can't remember the exact reading, but I measured my voltage just for grins not long after purchase, and my recollection was I was just barely 14V, like 13.9X. I clenched, but pushed on holding my breath waiting for failure. That was Jan/Feb. Actually forgot about it until this thread. If I hadn't measured, never would have known. Wonder if this might be "normal" for an aging V6....[/quote]

Mine runs between 13.5 and 13.8 with the radio and aircon on (code 20 on aircon)

Regards

Pete
 
#21 ·
Just a quick question, @Silkman - do your cooling fans run at low speed with the aircon on, or do they stay off until the high speed kicks in?

Shed's low speed circuits are dead-o so the high speed fans kick in and pull the voltage down from ~13.1 to ~11-ish - eventually the volts drop to ~11.0 and the ECU raises the idle speed to 1100 rpm to recharge the battery.

:eek:
 
#23 ·
alexgreyhead said:
Just a quick question, @Silkman - do your cooling fans run at low speed with the aircon on, or do they stay off until the high speed kicks in?

Shed's low speed circuits are dead-o so the high speed fans kick in and pull the voltage down from ~13.1 to ~11-ish - eventually the volts drop to ~11.0 and the ECU raises the idle speed to 1100 rpm to recharge the battery.

:eek:
Fans instantly turn on the low speed whenever I turn on aircon. As you remember I have dashpod temp surprise readings :roll: whenever I thrash the car in hot weather but I have given up.

Regarding alternator/battery charging voltage: It should be 14.4-14.8 on a perfect system (new car), however everything gets old and degrades and on a DC circuit voltage drops here and there. The Bosch battery shop said that they will fault the car, not the battery if charging voltage -with no electrical consumers on- is less than 13.8 Volts.

Alternator controller should compensate when additional electrics are on.
 
#24 ·
silkman said:
however everything gets old and degrades and on a DC circuit voltage drops here and there.
Yep, we're all getting up there little by little :p One of my other vices is sailing, and DC voltage drops due to resistance due to corrosion etc. is a perpetual way on older boats. Wondering what part of our systems is deteriorating in unison and is the weak link - seems several of us are all in the same range. Basic ground connections are often the culprit. Can't remember everything you've done, so forgive me if you wrote you checked this, but what do we have in the way of an engine grounding strap on these and have you checked it and not just for integrity, but pulled it on both ends and cleaned mating surfaces?
 
#25 · (Edited by Moderator)
Progress - got another +0.2Volts

After taking the TT to the electrician in previous post who fixed the first two cables, today I cleaned a bit more thoroughly the fusebox area on top of battery.

Cost: 4 euros for a small tube of (silicone based) dielectric grease. This is probably the same stuff that goes on the brake caliper sliding pins but make sure it says "dielectric grease" on the package before you use it for electric work.
IMG_0014(2).JPG


Remove negative battery cable first

Take a picture to see what goes where
IMG_0008.JPG


Then I unplugged all cables from the fusebox, removed the high amperage fuses and sanded them and the bottom of wire connectors with 120grit sandpaper until sparking clean. Added some grease on the fuses and fitted everything together.
IMG_0009(1).JPG

IMG_0012(2).JPG


Sanded the green fuses too and added grease and finally removed the 3pin socket and added some grease in its pins.
IMG_0011(2).JPG


Will tackle the ground points next with the same method but waiting for the rear battery plate from Audi.

Slowly but surely getting there (Code 20 on aircon)
 

Attachments