Hi All,
I know this link is a little old now, but it was just the business for helping me to fix my Drivers Door micro switch.
I'm new to the TT (5 weeks in... still loving it). When I bought the car, I found that the window drop/lift, along with all the other sensing, that tells the car that the door is open (clock & speedo light up, door open symbol when keys in ignition, the buzzer when lights left on.) to be a bit intermitent. It last a week, being hit n miss, then stopped all together. Having reseached the forum, it had to be the micro switch in the drivers door mechanism. Here's my route to the fix, and the options you have.
1) Main dealer - buy a new door mechanism... about £120 ... ouch! [smiley=bigcry.gif]
2) Buy a second hand door mechnism - mmm :? Well, you try finding one! Lots of passenger ones out there, and if you go for a s/h drivers one, the switch will not probably work in it, or last very long. A false economy... I know, I did try this with a s/h one from europe... mechanism fine, but switch not working.
3) replace the micro switch - already mentioned above. You may find your way here, if the switch is broken, as opposed to worn. I didn't need to go this route.
4) Plastic Strip and Super Glue! - I went this route in the end, and worked like a dream! Here's how...
- You really do need Spine M8 to release the lock-tighted door mechanism bolts. Torx did not work for me. Bought a cheap set of eBay, about £7, did the trick.
1) - remove the door card (trim). I used WAKs instructions... brilliant. Find them here...
http://www.wak-tt.com/mods/doorpanel/doorpanel.htm
This gets you to the point of having the door card resting in the door aperture, wires still connected, with the door open. Gicing access to the lock mechnism from the inside. (Note - The tip on window down, and plastic strip over metal edge, when refitting.)
2) Removed the 2x Spline M8 bolts that hold the door mechanism to the door.
3) Release the plastic anti tamper cover, thats over the lock mechism. It takes a bit of tugging, It did help with the Door Mechanism lose i nthe door.
4) Door Handle Connection - You'll see a cable and a rod. Push the mechanism lever towards the door handle (push outwards) This slackens the cable, and allows you to twist the black plasitc disk on the end of the wire, and pop it off the door mechanism. The rod is just located in a mechanism, so the whole door mecahnism is now free.
5) Remove the last bit holding the door mechanism, the multi-pin connector. It's a bit of fiddle, but with mechanism free, you can turn it round and see how its locked in place. I used a small screw driver and gently wedge it over the lock lug and popped it off. The Door Mechanism is now in your hand, and you hand has a a few scrapes! :roll:
Time for a tea, and a closer look at what is going on with the micro switch!
1) You'll see 2 wires going to the switch. The switch is locked in place by a metal clip.
2) Use a screwdriver and gently prise the lock clip off the door mechanism. It will ping off, as there is tension there.
3) now you see the top of the switch tucked into a metal resess. It is located in the resess, by 2 plastic lugs on its body. They slot into 2 holes in the side of the resess. You can just wiggle the switch out of these, as you pull the switch upwards. In the resess you can see the door mechanism that rocks over the door shut. This is the surface that rolls on and off of the micro switch, as you open n shut the door.
4) Clean up the switch, resess and door roll mechanism. I just used a rag and wiped up.
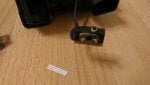
You will now see why you have an issue with your switch. There should be a grey dome cover, over the black micro switch. Your will probably hava a fully exposed black switch head, with a circle of grey round the outside. The dome completely worn away, leaving just the switch head. Does the switch still click, when pressed? if so, you're in business. If not, you probably need a new switch. Mine clicked fine, and had nothing left of the grey dome. (See first & second pic)
Here's the fix, and check out the pics below...
1) find a bit of plastic! - I used the lid off a tub of margarine (...flora!) and cut a small strip off. I was about 20mm x 5mm. It just has to be a little shorter than the length of the switch and a smidge narrower than the switch. This is enough thickness to fill the void left by the woren out plastic dome, over the micro switch. (See the white strip in first and second pic)
2) tiny drop of supeglue on the back of the switch, at the end furthest away from the switch.
3) line up your plastic strip and then place the end of it in the superglue and hold. It wil be resting over the micro switch, which bends the strip upwards. (See third pic) Thats ok. Don't stick your fingers to the switch, or you will struggle to put the switch in the resess! :lol:
4) Once dry... and it bonds and dries within a couple of minutes, pop the switch back in the resses. It should locate in the two holes and the plastic strip mates up with the rocker mechanism in the door mechanism. (see fourth pic - you should see a white line. thats the plastic strip. Note, that the spring metal clip is not shown in the pic.)
5) Press the retaining clip back over the micro switch.. Job Done.
6) More Tea... then Test your newly fixed door mechanism. Just plug the multi-pin connector into the door mechanism, before re-fitting. The door window will instantly drop it's 10mm!

7) Refit mechnism in door, which is just a reverse of taking out. The Anti tamper shield is a bit of struggle to refit. I found that connecting the exterior door handle rod and and cable, then getting the shield in place, you kind of fit them together, as they do mate up. Take your time and work it in.
8) Continue putting the door back to together as per WAKs article, mentioned above.
It's been working like a dream ever since! Hope this, my first ever, write up and pics help.
Cheers, Greg